machine learning +
Build a Python AI Chatbot with Memory Using LangChain
Explainable Retrieval: How to Make RAG Systems Transparent & Trustworthy
Explainable Retrieval is a technique that makes RAG (Retrieval-Augmented Generation) systems transparent by showing users which documents were retrieved, why they were chosen, and how confident the system is in its selections. This enables better trust, debugging, and bias detection in AI applications.
Explainable Retrieval is a technique that makes RAG (Retrieval-Augmented Generation) systems transparent by showing users which documents were retrieved, why they were chosen, and how confident the system is in its selections. This enables better trust, debugging, and bias detection in AI applications._
You know that situation when an AI gives you an answer but you’re not sure if you should trust it?
You want to peek behind the curtain and see the sources, understand the reasoning, maybe even verify the information yourself.
That’s exactly what Explainable Retrieval solves.
It transforms black-box RAG systems into glass-box systems where you can see, understand, and trust the retrieval process.
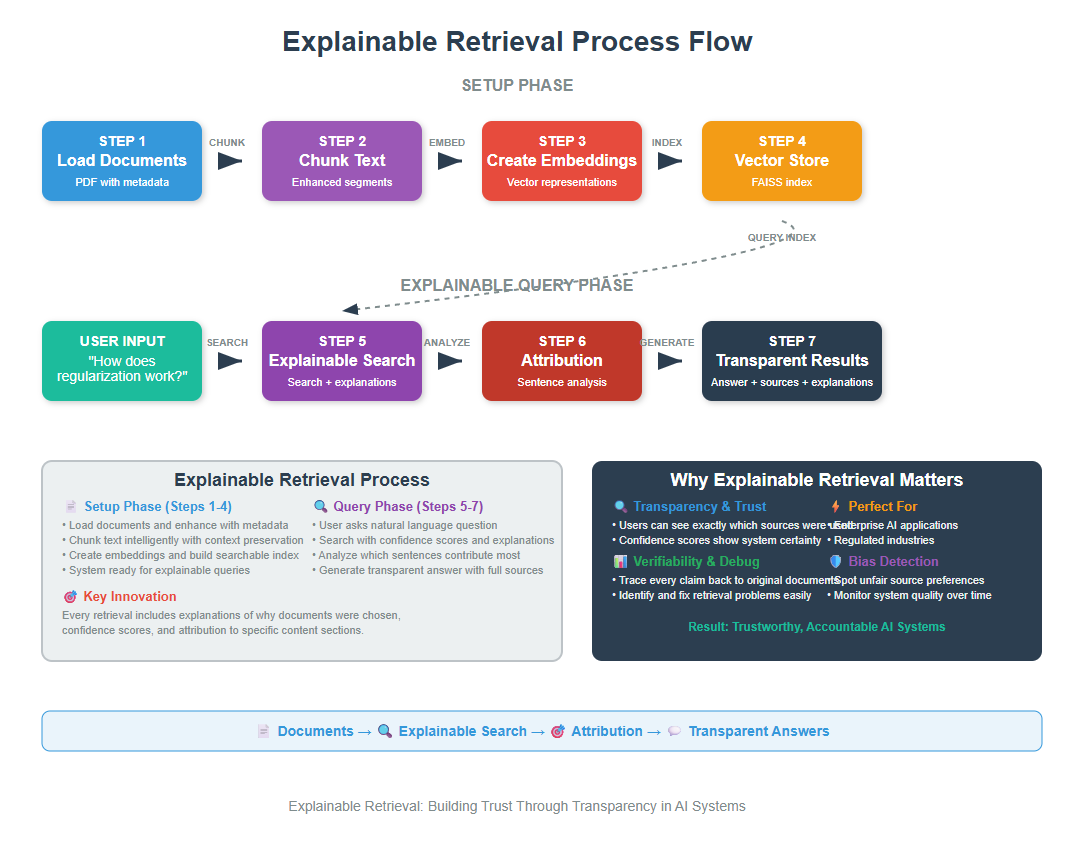
1. The Trust Problem in RAG Systems
Let me start with a real scenario. You ask your company’s internal AI assistant: “What’s our policy on remote work?” The AI responds with detailed information. But here’s the thing – you have no idea which documents it pulled this from, how recent the information is, or whether it cherry-picked certain facts while ignoring others.
This creates several problems:
- Trust issues: Users can’t verify the information
- Debugging difficulties: Developers can’t understand why the system made certain choices
- Bias detection: Hidden biases in document selection remain undetectable
- Quality control: No way to assess retrieval quality
Explainable Retrieval fixes this by making the entire process transparent. That is:
1. Show exactly which documents contributed to the answer, with direct citations and links back to sources.
2. Display confidence scores that show how relevant each retrieved document is to the query.
3. Explain which parts of the query matched which parts of the documents.
4. Show the decision-making process behind document selection.
5. Present documents that might offer different viewpoints on the topic.
Think of it like having a research assistant who not only finds information for you but also explains their search strategy, shows you their notes, and lets you examine their sources.
2. Setting Up Your Environment
Let’s install our packages, I’m assuming that you have VS Code and Python ready.
bash
conda create -p rag python==3.12
conda activate rag
pip install ipykernel
pip install langchain openai faiss-cpu python-dotenv tiktoken pypdf numpy pandas
Now let’s import everything we need
python
import os
import numpy as np
import pandas as pd
from dotenv import load_dotenv
from langchain_openai import ChatOpenAI, OpenAIEmbeddings
from langchain.text_splitter import RecursiveCharacterTextSplitter
from langchain_community.document_loaders import PyPDFLoader
from langchain_community.vectorstores import FAISS
from langchain.prompts import PromptTemplate
from langchain.schema import Document
import textwrap
from typing import List, Dict, Tuple, Any
import json
from datetime import datetime

# Load environment variables
load_dotenv()
os.environ["OPENAI_API_KEY"] = os.getenv('OPENAI_API_KEY')

print("Environment setup complete!")
python
Environment setup complete!
Make sure you have your .env file with your OpenAI API key
python
OPENAI_API_KEY=your_api_key_here
3. Loading and Preparing Documents with Metadata
Now we’re going to load a PDF file and prepare it for our explainable retrieval system. For explainable retrieval, we need rich metadata about our documents.
Metadata is like a “data about data” – it tells us information about each document that helps us track where information came from.
You can download the pdf here.
python
# Load the PDF document
document_path = "Neural Networks.pdf"
pdf_loader = PyPDFLoader(document_path)
raw_docs = pdf_loader.load()

# Add enhanced metadata to each document
enhanced_docs = []
for i, doc in enumerate(raw_docs):
    # Add comprehensive metadata
    doc.metadata.update({
        'document_id': f"doc_{i:03d}",
        'source_file': document_path,
        'page_number': i + 1,
        'total_pages': len(raw_docs),
        'load_timestamp': datetime.now().isoformat(),
        'content_length': len(doc.page_content),
        'content_preview': doc.page_content[:100] + "..." if len(doc.page_content) > 100 else doc.page_content
    })
    enhanced_docs.append(doc)

print(f"Loaded {len(enhanced_docs)} pages with enhanced metadata")
print(f"Sample metadata: {json.dumps(enhanced_docs[0].metadata, indent=2)}")
python
Loaded 51 pages with enhanced metadata
Sample metadata: {
  "producer": "Skia/PDF m136",
  "creator": "Mozilla/5.0 (Windows NT 10.0; Win64; x64) AppleWebKit/537.36 (KHTML, like Gecko) Chrome/136.0.0.0 Safari/537.36",
  "creationdate": "2025-05-29T08:55:52+00:00",
  "title": "Comprehensive Guide to Neural Networks",
  "moddate": "2025-05-29T08:55:52+00:00",
  "source": "Neural Networks.pdf",
  "total_pages": 51,
  "page": 0,
  "page_label": "1",
  "document_id": "doc_000",
  "source_file": "Neural Networks.pdf",
  "page_number": 1,
  "load_timestamp": "2025-05-29T21:07:13.045596",
  "content_length": 1854,
  "content_preview": "Comprehensive Guide to Neural Networks\nTable of Contents\n1. Introduction to Neural Networks\n2. Histo..."
}
PyPDFLoader read our PDF and converted each page into a separate document object and we added metadata to each of the pages, including:
– A unique ID for tracking
– The original filename
– Page number (count from 1, not 0!)
– Total pages in the document
– When we processed it
– How long the content is
– A preview of the content
Let’s chunk our documents with metadata preservation
python
# Configure our text splitter
chunk_size = 500
chunk_overlap = 100

text_splitter = RecursiveCharacterTextSplitter(
    chunk_size=chunk_size,
    chunk_overlap=chunk_overlap,
    separators=["\n\n", "\n", ". ", " ", ""]
)

# Create enhanced chunks
enhanced_chunks = []

for doc in enhanced_docs:
    # Split the document
    chunks = text_splitter.split_documents([doc])

    # Add enhanced metadata to each chunk
    for i, chunk in enumerate(chunks):
        chunk.metadata.update({
            'chunk_id': f"{doc.metadata['document_id']}_chunk_{i:03d}",
            'chunk_index': i,
            'total_chunks_in_doc': len(chunks),
            'chunk_size': len(chunk.page_content),
            'overlap_info': f"overlap_{chunk_overlap}_chars" if i > 0 else "no_overlap"
        })
        enhanced_chunks.append(chunk)

print(f"Created {len(enhanced_chunks)} enhanced chunks")
print(f"Sample chunk metadata: {json.dumps(enhanced_chunks[0].metadata, indent=2)}")
python
Created 360 enhanced chunks
Sample chunk metadata: {
  "producer": "Skia/PDF m136",
  "creator": "Mozilla/5.0 (Windows NT 10.0; Win64; x64) AppleWebKit/537.36 (KHTML, like Gecko) Chrome/136.0.0.0 Safari/537.36",
  "creationdate": "2025-05-29T08:55:52+00:00",
  "title": "Comprehensive Guide to Neural Networks",
  "moddate": "2025-05-29T08:55:52+00:00",
  "source": "Neural Networks.pdf",
  "total_pages": 51,
  "page": 0,
  "page_label": "1",
  "document_id": "doc_000",
  "source_file": "Neural Networks.pdf",
  "page_number": 1,
  "load_timestamp": "2025-05-29T21:07:13.045596",
  "content_length": 1854,
  "content_preview": "Comprehensive Guide to Neural Networks\nTable of Contents\n1. Introduction to Neural Networks\n2. Histo...",
  "chunk_id": "doc_000_chunk_000",
  "chunk_index": 0,
  "total_chunks_in_doc": 5,
  "chunk_size": 493,
  "overlap_info": "no_overlap"
}
Instead of a few large pages, we now have many small, focused chunks, each with detailed metadata.
This gives us much better precision when searching – we can find exactly the paragraph that answers a question, rather than returning an entire page with mostly irrelevant information.
4. Building the Explainable Vector Store
Now let’s create a vector store that tracks additional information for explainability
python
# Initialize our embeddings model and create the vector store
embeddings_model = OpenAIEmbeddings()
vector_store = FAISS.from_documents(enhanced_chunks, embeddings_model)

# Create a metadata lookup for easy access
document_metadata = {doc.metadata['chunk_id']: doc.metadata for doc in enhanced_chunks}

print("Vector store created successfully!")
python
Vector store created successfully!
Let’s create helper functions for explainable search
python
def calculate_confidence(score):
    """Convert similarity score to confidence level"""
    # Lower scores mean higher similarity in FAISS
    if score < 0.3:
        return "Very High"
    elif score < 0.5:
        return "High"
    elif score < 0.7:
        return "Medium"
    elif score < 0.9:
        return "Low"
    else:
        return "Very Low"

def generate_explanation(doc, score, query):
    """Generate human-readable explanation for why this document was retrieved"""
    confidence = calculate_confidence(score)
    chunk_id = doc.metadata['chunk_id']
    page_num = doc.metadata['page_number']

    explanation = f"This content from page {page_num} (chunk {chunk_id}) has {confidence.lower()} relevance to your query. "
    explanation += f"The similarity score is {score:.3f}, indicating "

    if score < 0.4:
        explanation += "strong semantic alignment with your question."
    elif score < 0.7:
        explanation += "moderate semantic similarity to your question."
    else:
        explanation += "some potential relevance, but may not directly address your question."

    return explanation

def extract_key_terms(content, query):
    """Extract key terms that likely contributed to the match"""
    query_words = set(query.lower().split())
    content_words = set(content.lower().split())

    # Find overlapping terms
    common_terms = query_words.intersection(content_words)

    # Simple keyword extraction
    important_words = []
    for word in content.split():
        if word.lower() in query.lower() and len(word) > 3:
            important_words.append(word)

    return list(set(important_words))[:5]  # Return top 5 unique terms

print("Helper functions created!")
python
Helper functions created!
Now let’s create our main explainable search function
python
def similarity_search_with_explanations(query, k=5):
    """Perform similarity search with detailed explanations"""

    # Perform similarity search with scores
    docs_with_scores = vector_store.similarity_search_with_score(query, k=k)

    # Enhance results with explanations
    explained_results = []

    for i, (doc, score) in enumerate(docs_with_scores):
        chunk_id = doc.metadata['chunk_id']

        explanation = {
            'rank': i + 1,
            'document': doc,
            'similarity_score': float(score),
            'confidence_level': calculate_confidence(score),
            'metadata': document_metadata[chunk_id],
            'explanation_text': generate_explanation(doc, score, query),
            'key_terms': extract_key_terms(doc.page_content, query)
        }

        explained_results.append(explanation)

    return explained_results

print("Explainable search function ready!")
python
Explainable search function ready!
Let’s test our explainable search and see what kind of transparency we get
python
# Test query
test_query = "What is Mish activation function and its benefits?"

# Perform explainable search
explained_results = similarity_search_with_explanations(test_query, k=3)

# Display results
print(f" Query: {test_query}")
print("=" * 80)

for result in explained_results:
    print(f"\n RESULT {result['rank']}")
    print(f"Confidence: {result['confidence_level']}")
    print(f"Score: {result['similarity_score']:.3f}")
    print(f"Source: Page {result['metadata']['page_number']}, Chunk {result['metadata']['chunk_index']}")
    print(f"Key Terms: {', '.join(result['key_terms'])}")
    print(f"Explanation: {result['explanation_text']}")
    print(f"Content Preview: {result['document'].page_content[:150]}...")
    print("-" * 60)
python
 Query: What is Mish activation function and its benefits?
================================================================================

 RESULT 1
Confidence: Very High
Score: 0.274
Source: Page 25, Chunk 6
Key Terms: activation, Mish
Explanation: This content from page 25 (chunk doc_024_chunk_006) has very high relevance to your query. The similarity score is 0.274, indicating strong semantic alignment with your question.
Content Preview: normal distribution. GELU has shown particular effectiveness in transformer-based models.
Mish activation function, defined as Mish(x) = x × tanh(soft...
------------------------------------------------------------

 RESULT 2
Confidence: High
Score: 0.396
Source: Page 25, Chunk 7
Key Terms: activation
Explanation: This content from page 25 (chunk doc_024_chunk_007) has high relevance to your query. The similarity score is 0.396, indicating strong semantic alignment with your question.
Content Preview: Adaptive activation functions allow networks to learn optimal activation shapes during training,
either through parameterized functions or by learning...
------------------------------------------------------------

 RESULT 3
Confidence: High
Score: 0.413
Source: Page 23, Chunk 6
Key Terms: activation, function
Explanation: This content from page 23 (chunk doc_022_chunk_006) has high relevance to your query. The similarity score is 0.413, indicating moderate semantic similarity to your question.
Content Preview: The choice of activation function significantly impacts training dynamics, convergence speed, and
final performance. Different activation functions ha...
------------------------------------------------------------
Let me explain what you’re seeing in these results:
1. Rank: The order of relevance, with 1 being the most relevant document found.
2. Confidence: A human-friendly translation of the similarity score. “Very High” means the system is very confident this document answers your question.
3. Score: The raw mathematical similarity score. Lower numbers mean higher similarity in FAISS (think of it as “distance” – closer is better).
4. Source: Exactly where this information came from – which page of the original document and which chunk within that page.
5. Key Terms: The words that appeared in both your query and the retrieved document. These are likely what caused the match.
6. Explanation: A plain-English explanation of why this document was chosen and how confident the system is.
7. Content Preview: The actual text content so you can judge for yourself whether it’s relevant.
What makes this “explainable”? Here the retrieval provides transparency by showing why each document was selected—highlighting source content, matching terms, relevance scores, and confidence levels.
Hence users can easily verify, understand, and trace back the reasoning behind each result.
5. Advanced Attribution Techniques
So far, we’ve been looking at which documents are relevant to our query. But what if we want to go deeper? What if we want to know which specific sentences or paragraphs within those documents are most relevant?
This is called “attribution” – figuring out exactly which parts of the retrieved content contributed most to the match.
python
def classify_contribution(score):
    """Classify the contribution level of a sentence"""
    if score > 0.8:
        return "Very High"
    elif score > 0.6:
        return "High"
    elif score > 0.4:
        return "Medium"
    elif score > 0.2:
        return "Low"
    else:
        return "Very Low"

def analyze_token_contributions(query, document_text):
    """Analyze which tokens in the document contribute most to the match"""

    # Split document into sentences for analysis
    sentences = document_text.split('. ')
    sentence_scores = []

    # Calculate similarity for each sentence
    query_embedding = embeddings_model.embed_query(query)

    for i, sentence in enumerate(sentences):
        if len(sentence.strip()) > 10:  # Skip very short sentences
            sentence_embedding = embeddings_model.embed_query(sentence)

            # Calculate cosine similarity
            similarity = np.dot(query_embedding, sentence_embedding) / (
                np.linalg.norm(query_embedding) * np.linalg.norm(sentence_embedding)
            )

            sentence_scores.append({
                'sentence_index': i,
                'sentence': sentence.strip(),
                'similarity_score': float(similarity),
                'contribution_level': classify_contribution(similarity)
            })

    # Sort by similarity score
    sentence_scores.sort(key=lambda x: x['similarity_score'], reverse=True)

    return sentence_scores

# Analyze attribution for our top result
top_result = explained_results[0]
attribution_analysis = analyze_token_contributions(
    test_query,
    top_result['document'].page_content
)

print(" SENTENCE-LEVEL ATTRIBUTION ANALYSIS")
print("=" * 60)
for i, sentence_data in enumerate(attribution_analysis[:3]):  # Show top 3 sentences
    print(f"\nSentence {i+1} (Score: {sentence_data['similarity_score']:.3f})")
    print(f"Contribution: {sentence_data['contribution_level']}")
    print(f"Text: {sentence_data['sentence']}")
    print("-" * 40)
python
 SENTENCE-LEVEL ATTRIBUTION ANALYSIS
============================================================

Sentence 1 (Score: 0.884)
Contribution: Very High
Text: Mish has
demonstrated improvements over ReLU in various computer vision tasks.
Adaptive activation functions allow networks to learn optimal activation shapes during training,
----------------------------------------

Sentence 2 (Score: 0.853)
Contribution: Very High
Text: GELU has shown particular effectiveness in transformer-based models.
Mish activation function, defined as Mish(x) = x × tanh(softplus(x)), provides smooth, non-
monotonic behavior with theoretical properties that can improve optimization dynamics
----------------------------------------

Sentence 3 (Score: 0.701)
Contribution: High
Text: normal distribution
----------------------------------------
This attribute analysis:
1. Breaks down documents: Instead of treating a document as one big block of text, it splits it into individual sentences.
2. Scores each sentence: It calculates how relevant each sentence is to your original query by comparing their embeddings.
3. Ranks sentences: It sorts sentences by relevance, so you can see which parts of the document are most important.
4. Provides explanations: It translates the mathematical scores into human-friendly contribution levels.
8. Building a Complete Explainable RAG System
Now we’re going to put all the pieces together into a complete system that can answer questions with full transparency, ie. a complete explainable RAG system.
python
def answer_with_explanations(query, k=3, show_attribution=True):
    """Generate answer with full explainability"""

    print(f" Processing Query: {query}")
    print("=" * 80)

    # Step 1: Explainable Retrieval
    print("\n STEP 1: EXPLAINABLE RETRIEVAL")
    explained_results = similarity_search_with_explanations(query, k)

    # Show retrieval explanations
    for result in explained_results:
        print(f"\n📄 Document {result['rank']} (Confidence: {result['confidence_level']})")
        print(f"   Source: Page {result['metadata']['page_number']}")
        print(f"   Score: {result['similarity_score']:.3f}")
        print(f"   Reason: {result['explanation_text']}")

    # Step 2: Attribution Analysis (optional)
    if show_attribution:
        print(f"\n STEP 2: ATTRIBUTION ANALYSIS")
        top_doc = explained_results[0]['document'].page_content
        attribution_scores = analyze_token_contributions(query, top_doc)

        print("Most relevant sentences from top document:")
        for i, sent_data in enumerate(attribution_scores[:2]):
            print(f"   {i+1}. {sent_data['sentence'][:100]}... (Score: {sent_data['similarity_score']:.3f})")

    # Step 3: Generate Answer with Context
    print(f"\n STEP 3: ANSWER GENERATION")
    context = "\n\n".join([result['document'].page_content for result in explained_results])

    answer_prompt = PromptTemplate(
        input_variables=["question", "context"],
        template="""Based on the following context, provide a comprehensive answer to the question.

Context:
{context}

Question: {question}

Answer with supporting details:"""
    )

    llm_model = ChatOpenAI(temperature=0, model_name="gpt-4o-mini")
    answer_chain = answer_prompt | llm_model
    final_answer = answer_chain.invoke({
        "question": query,
        "context": context
    })

    print(f"Generated Answer:")
    print(textwrap.fill(final_answer.content, width=80))

    # Step 4: Provide Sources and Explanations
    print(f"\n STEP 4: SOURCES AND EXPLANATIONS")
    for result in explained_results:
        print(f"   • Page {result['metadata']['page_number']}, "
              f"Chunk {result['metadata']['chunk_index']} "
              f"(Confidence: {result['confidence_level']})")

    # Return comprehensive results
    return {
        'query': query,
        'answer': final_answer.content,
        'retrieval_results': explained_results,
        'attribution_analysis': attribution_scores if show_attribution else None,
        'sources': [r['metadata'] for r in explained_results]
    }

# Test the complete system
test_query = "What is Mish activation function and its benefits?"
complete_result = answer_with_explanations(test_query, k=3)
python
 Processing Query: What is Mish activation function and its benefits?
================================================================================

 STEP 1: EXPLAINABLE RETRIEVAL

 Document 1 (Confidence: Very High)
   Source: Page 25
   Score: 0.274
   Reason: This content from page 25 (chunk doc_024_chunk_006) has very high relevance to your query. The similarity score is 0.274, indicating strong semantic alignment with your question.

 Document 2 (Confidence: High)
   Source: Page 25
   Score: 0.396
   Reason: This content from page 25 (chunk doc_024_chunk_007) has high relevance to your query. The similarity score is 0.396, indicating strong semantic alignment with your question.

 Document 3 (Confidence: High)
   Source: Page 23
   Score: 0.413
   Reason: This content from page 23 (chunk doc_022_chunk_006) has high relevance to your query. The similarity score is 0.413, indicating moderate semantic similarity to your question.

 STEP 2: ATTRIBUTION ANALYSIS
Most relevant sentences from top document:
   1. Mish has
demonstrated improvements over ReLU in various computer vision tasks.
Adaptive activation f... (Score: 0.884)
   2. GELU has shown particular effectiveness in transformer-based models.
Mish activation function, defin... (Score: 0.853)

 STEP 3: ANSWER GENERATION
Generated Answer:
The Mish activation function is defined mathematically as:  \[ \text{Mish}(x) =
x \times \tanh(\text{softplus}(x)) \]  where the softplus function is given by:
\[ \text{softplus}(x) = \log(1 + e^x) \]  ### Benefits of Mish Activation
Function:  1. **Smooth and Non-Monotonic Behavior**:     - Mish provides a
smooth curve that is non-monotonic, which means it can take on both positive and
negative values. This characteristic allows for more complex representations of
data, enabling the model to learn intricate patterns.  2. **Improved
Optimization Dynamics**:    - The theoretical properties of Mish contribute to
better optimization dynamics. The smoothness of the function helps in
maintaining a stable gradient flow, which is crucial for effective training of
deep networks.  3. **Enhanced Gradient Flow**:    - Mish facilitates better
gradient flow compared to traditional activation functions like ReLU (Rectified
Linear Unit). This is important because effective gradient flow ensures that
training signals can propagate backward through the network without vanishing or
exploding, which can hinder learning.  4. **Performance in Computer Vision
Tasks**:    - Empirical studies have shown that Mish outperforms ReLU in various
computer vision tasks. This suggests that Mish can help models achieve higher
accuracy and better generalization on visual data.  5. **Flexibility in
Learning**:    - As an activation function, Mish can adapt to the data it is
trained on, allowing for more flexible learning. This adaptability can lead to
improved performance in diverse applications, as the function can adjust to the
specific characteristics of the input data.  6. **Compatibility with Deep
Learning Architectures**:    - Mish is particularly effective in transformer-
based models, which are widely used in natural language processing and other
domains. Its compatibility with these architectures makes it a valuable choice
for modern deep learning applications.  In summary, the Mish activation function
offers several advantages, including smooth and non-monotonic behavior, improved
optimization dynamics, enhanced gradient flow, and demonstrated performance
benefits in computer vision tasks. Its flexibility and compatibility with
advanced architectures further solidify its position as a strong alternative to
traditional activation functions like ReLU.

 STEP 4: SOURCES AND EXPLANATIONS
   • Page 25, Chunk 6 (Confidence: Very High)
   • Page 25, Chunk 7 (Confidence: High)
   • Page 23, Chunk 6 (Confidence: High)
Your explainable retrieval system is now ready to bring transparency, accountability, and trust to AI applications. The future of AI isn’t just about making systems smarter – it’s about making them more understandable and trustworthy. You’ve just built a system that does exactly that.
Free Course
Master Core Python — Your First Step into AI/ML
Build a strong Python foundation with hands-on exercises designed for aspiring Data Scientists and AI/ML Engineers.
Start Free Course →Trusted by 50,000+ learners
Related Course
Master Gen AI — Hands-On
Join 5,000+ students at edu.machinelearningplus.com
Explore Course

