
CUDA Programming: Do Large scale parallel computing in GPU from Scratch
Learn CUDA Programming to implement large scale parallel computing in GPU from Scratch. Understand concepts and underlying principles.
While GPUs ((Graphics Processing Unit) are in high demand in video games, with the rise of Large Language Models (LLMs), GPUs are in high demand. They give the much needed large scale parallel computing capability required to train the LLMs (having billions of parameters).
So what is CUDA?
CUDA stands for Compute Unified Device Architecture is a parallel computing programming platform created by NVIDIA, that allows developers to use the GPUs for general purpose processing.
Think of CUDA as the programming language of the GPUs, providing an interface implemented via C/C++.
If you are familiar with PyTorch, you might have seen code like this (create random numbers in the GPU). This is made super simple using PyTorch.
python
import torch
torch.rand(size=(2,3)).to('cuda')
Today, we are going to get into the implementation details of how GPU programming actually works using CUDA.
1. The Need for GPUs – Simple Example
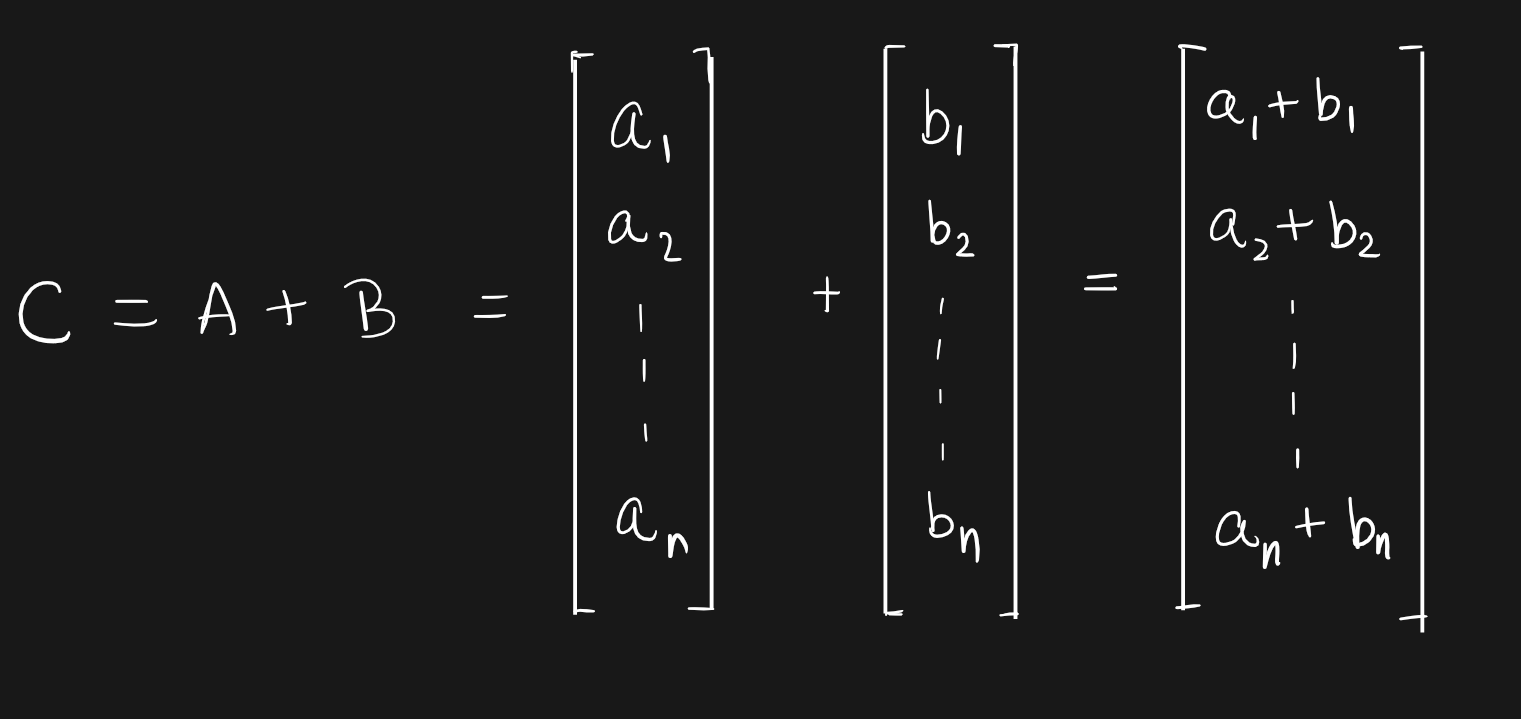
Imagine you want to add two vectors C = A + B.
A simple C program to do this will look something like this:
C
void AddTwoVectors(flaot A[], float B[], float C[]) {
    for (int i = 0; i < N; i++) {
        C[i] = A[i] + B[i];
    }
}
The function AddTwoVectors takes in the floats, computes the element by addition and stores the result in C array.
When we try to implement it, the computation happens in sequence.

However, the additions does not have a logic dependency on each other. So, they can be executed independently from each other, just like threading.

A simple example of this operation in C might look like this.
C
void AddTwoVectors(flaot A[], float B[], float C[]) {
    for (int i = 0; i < N; i++) {
        C[i] = A[i] + B[i];
    }
}
The above examplme may be effectively done using multithreading in order to keep the computations run in parallel.
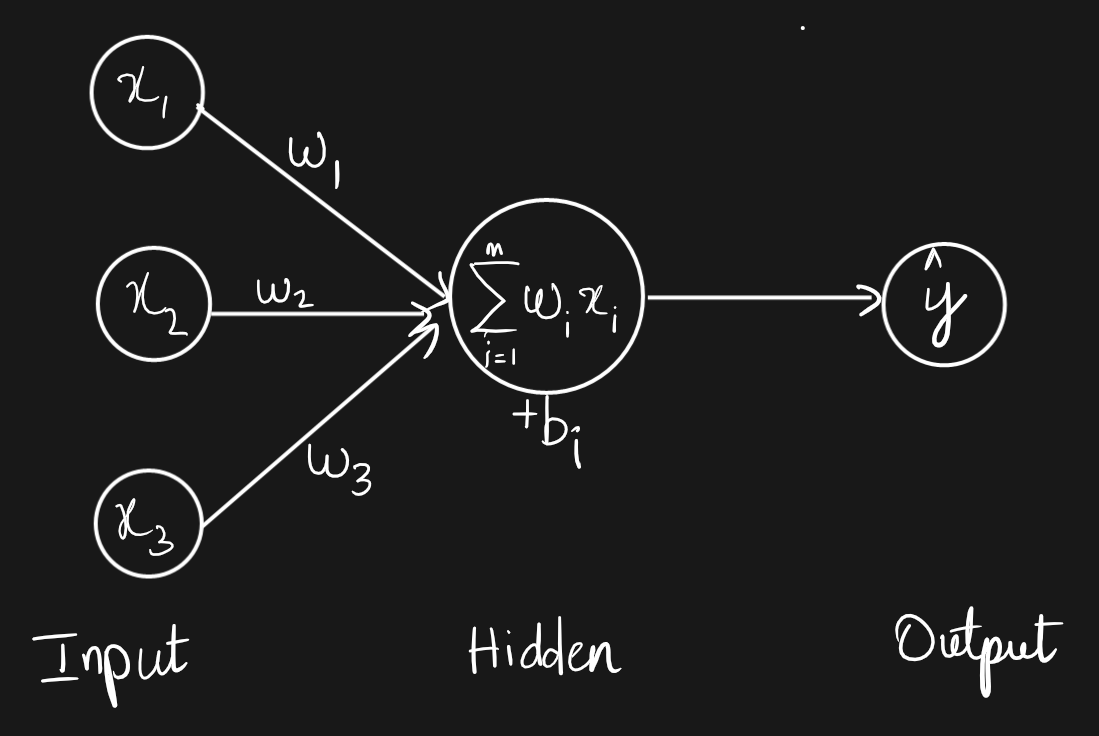
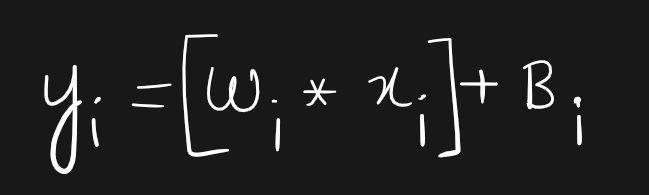
A serendipitous application of GPU comptutation is in training large neural nets such as deep learning models and LLMs. A very common computation done on GPUs is the linear layer, where we multiply the weigths of the neuron with the input value and add a bias term $B_i$.
In terms of matrices, it can be expressed as follows.
A common CPU can only run dozens of threads whereas modern GPUs can run millions of threads simulatneously.
A thread may take less time execute on a CPU but since GPUs can execute millions of them in parallel, it tremendously reduces the overall runtime.
A good analogy in real world to compare CPU vs GPU is that of a Race Car vs a Bus.

Though a Racecar is super fast compared to a bus, when it comes to transporting a large number of passengers, the bus is way faster in finishing the job.
This is possible because GPU devotes more transistors to data processing.
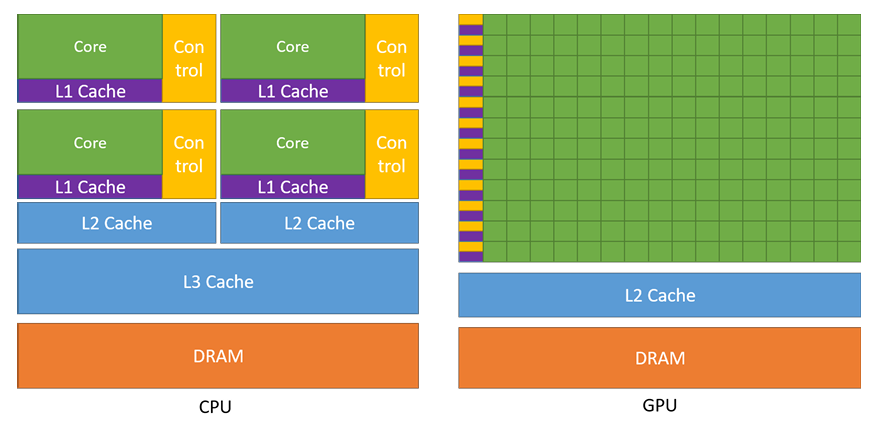
Devoting more transistors to data processing, for example, floating-point computations, is beneficial for highlyparallel computations. The GPU can hide memory access latencies with computation,instead of relying on large data caches and complex flow control to avoid memory access latencies.
2. Components of CUDA Programming
Let’s understand how CUDA programming is implemented. Going back to our C example for adding two vectors on a CPU:
C
void AddTwoVectors(float A[], float B[], float C[]) {
    for (int i = 0; i < N; i++) {
        C[i] = A[i] + B[i];
    }
}
The above code runs the for-loop in a sequence where i takes the values from 0 to (N-1).
We can implement the same in parallel in a GPU by running each of the N computations in an individual thread simultaneously in parallel.
This can be done by defining a kernel function VecAdd using the __global__ declaration specifier along with the number of CUDA threads that are required to execute the kernel function. To be more precise, we define a kernel function of the vector addition that is executed by the CPU on the GPU.
C
__global__ void VecAdd(float* A, float* B, float* C)
{
    int i = threadIdx.x;
    C[i] = A[i] + B[i];
}

__host__ int main()
{
    //...
    // Kernel invocation with N threads
    VecAdd<<<1, N>>>(A, B, C);
    //...
}
So, instead of writing a for-loop we only define the operation that must happen in parallel in a dedicated function VecAdd. But this time, the i is not a for-loop counter but instead represents the built-in variable for thread index (threadIdx) that executes the respective pair-wise addition (in parallel).
Also, observe closely the keywords __global__ and __host__. They designate where the respective functions need to be run, which brings us to the components of CUDA programming.
Components
(i) Host – Refers to the CPU and it’s memory where the program is hosted and run. However, the host program may run parts of the commands inside the GPU device.
(ii) Device – Refers to the GPU that executes the Kernel function.
(iii) Kernel – Refers to the function/s that is/are going to be executed inside the GPU simultaneously (probably in a large number of threads).
So, the host (CPU) runs the kernel function VecAdd in N threads on the GPU in parallel.
But what is the <<1,N>> written near VecAdd? We know N is the number of threads that must be run simultaneously, but how to read this syntax?
The ‘1’ <<1,N>> in refers to the number of blocks, where the blocks contain the threads.
But to understand this completely, we need to understand the thread hierarchy and how thread indexing works.
Before we move on, here is the sequence of steps that happens when executing CUDA programs:
- Setup – The host CPU executes the ‘host’ program.
Transfer data to Device memory
Run kernel across many threads
Transfer data back to host and free device memory
Process the output.
3. Thread Hierarchy: Threads, Blocks & Grid
Parallel execution is not just about starting multiple instances of a function to be run on the GPU. The computations needs to be intentionally structured in such a way that we calculative to execute the kernel function in large number of simultaneous threads so as to maximize the architectural strengths of the GPU.
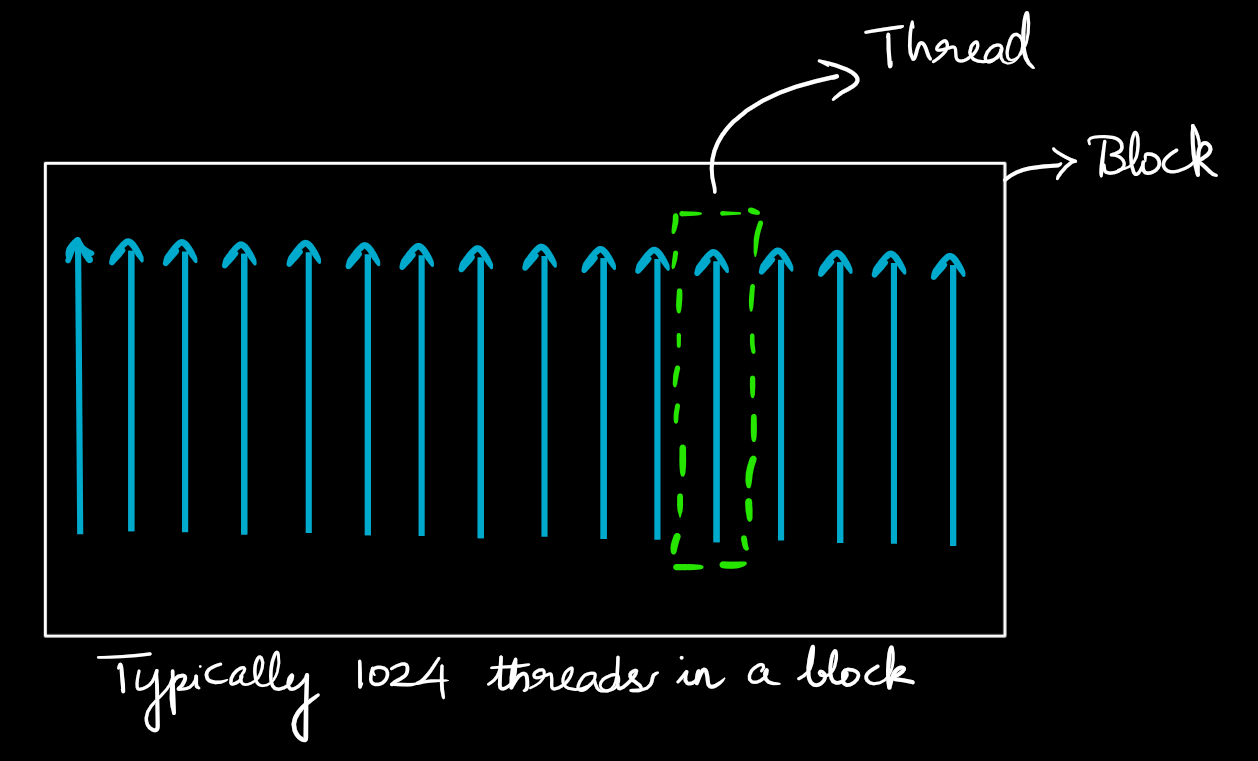
Thread
A thread is the smallest unit of execution, mapped to a single CUDA code.
Blocks
A block consists of multiple threads, defined based on requirement. All the threads in a block execute the same kernel and the threads within a block can share the data amongst them.
A single block can contain upto 1024 threads, but this capacity can vary based on the GPU architecture.
Grids
A grid is made of multiple blocks arranged in either 2D or 3D. The blocks with the grrid does not share data between them and therefore operate independently.

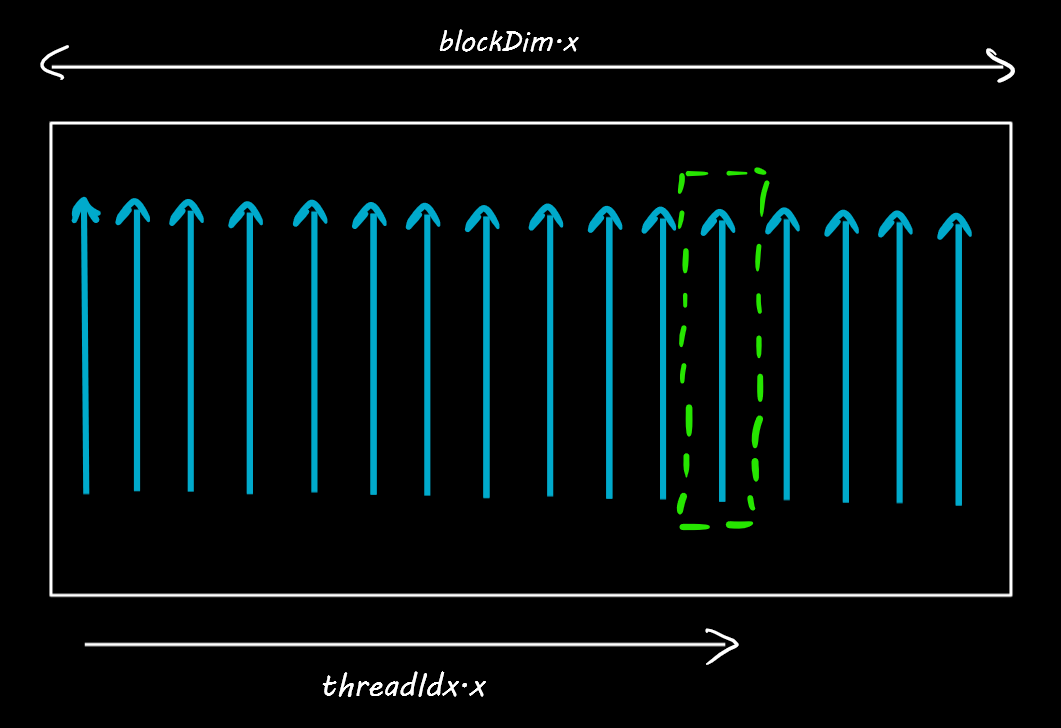
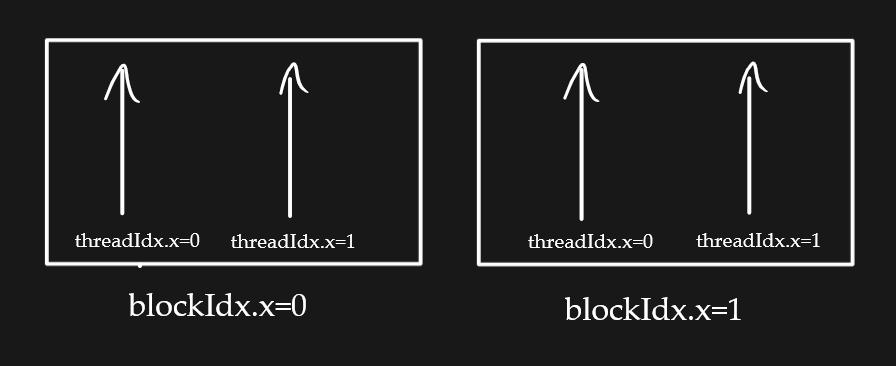
Every thread in a block has a unique thread index which is available as a built-in variable ThreadIdx.x. And every block has a built-in blockDim.x which tells the number of threads in a block.
Why are they useful?
Because, these variables can be used to locate the position of a thread inside the GPU.
Likewise, there are usually multiple blocks arranges in a sequence, like seen below. Can you get the location of the thread marked in green?
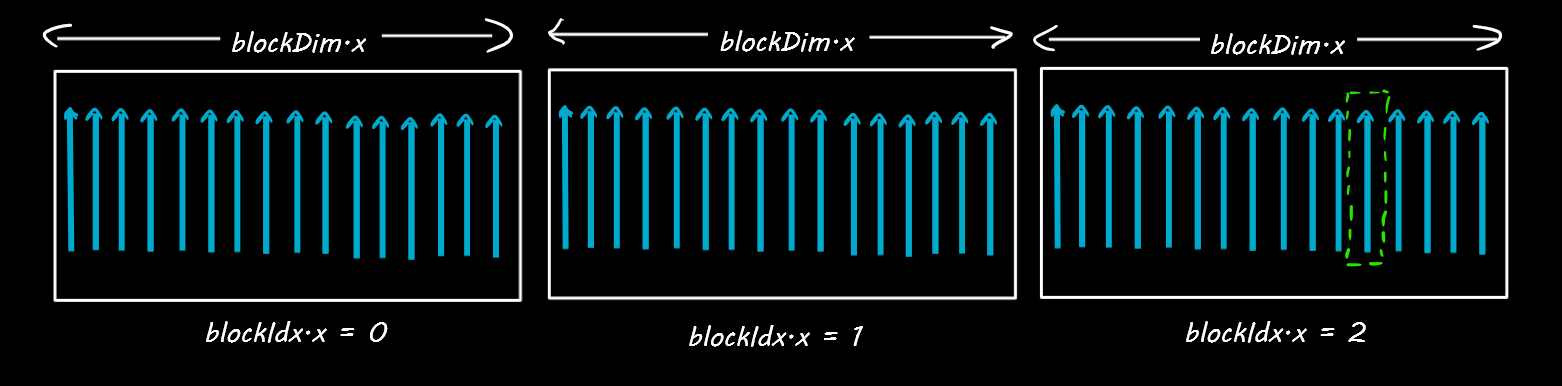
Since there are 16 threads in each of the blocks above, the value of blockDim.x = 16. And each block has an index position given by blockIdx.x. For the thread in green, blockIdx.x=2 and threadIdx.x=12.
So the location of the green thread is: (blockDim.x * blockIdx.x) + threadIdx.x = 2 * 16 + 12 = 44.
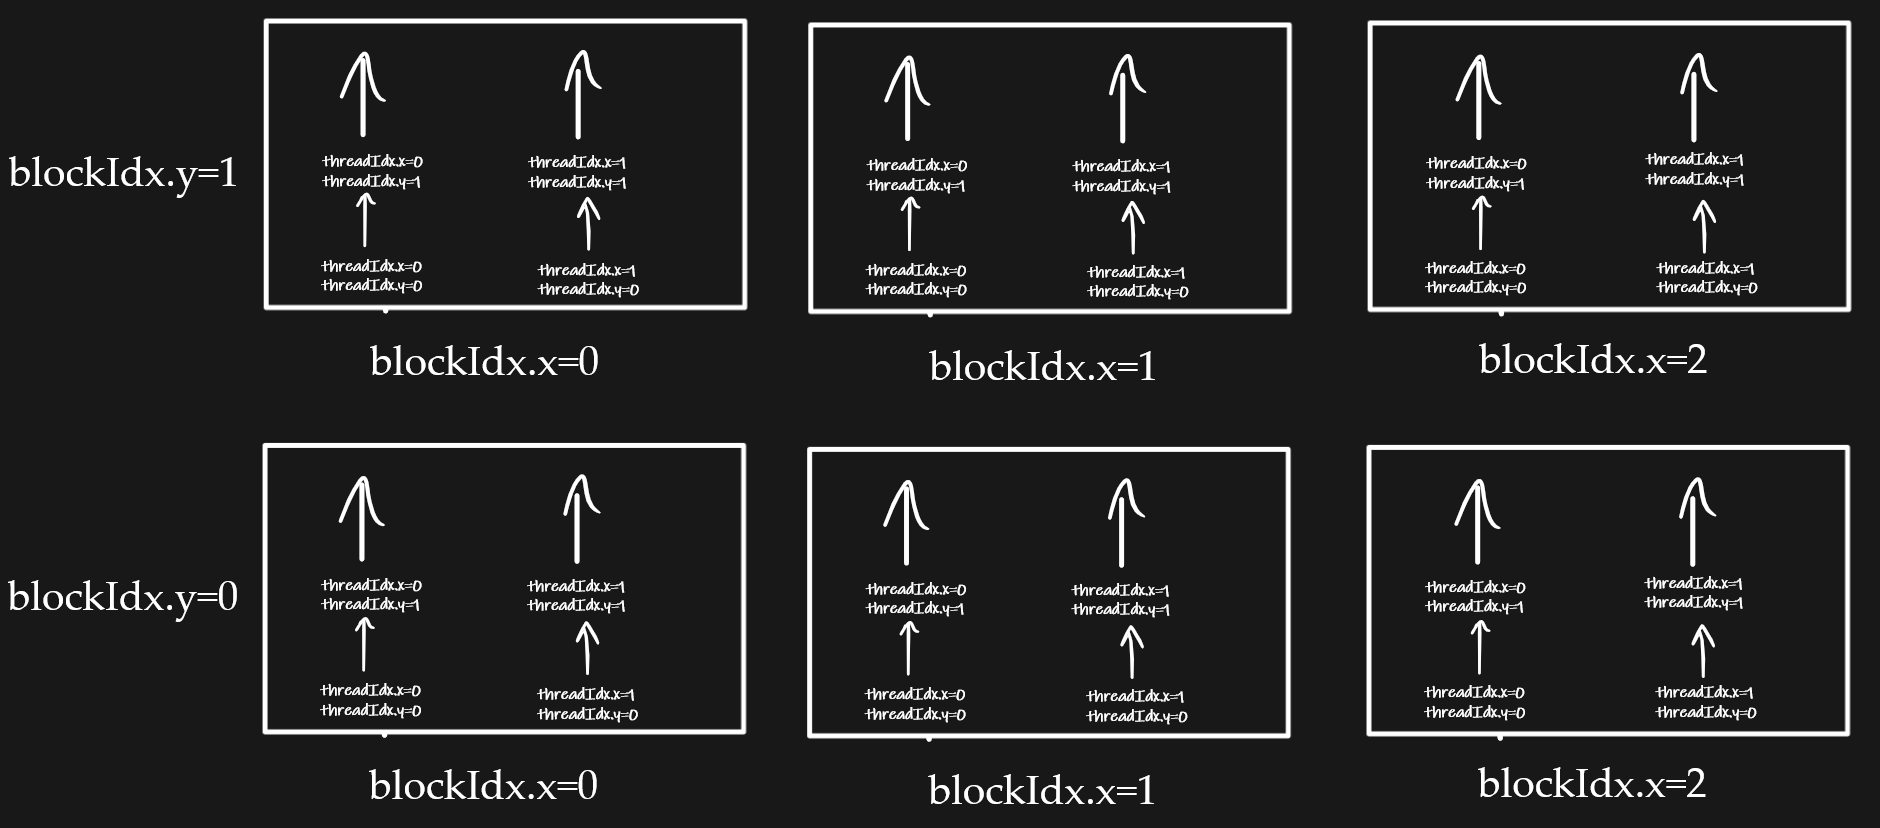
Besides, inside a block the threads could be arranged in 2 dimensions as below, in such cases, we will have a blockDix.x and blockDim.y to denote the block dimensions along the x and y axes respectively. Likewise the thread index can also be located in X and Y axes using threadIdx.x and threadIdx.y.
Let’s find the location of the thread below marked in red.

The location of the thread is given by: number of threads in a complete blocks + location of thread on current block
= (blockIdx.x * blockDim.x * blockDim.y) + (threadIdx.y * blockDim.x + threadIdx.x)
= 1 * 16 * 3 + (1 * 16) + 4
= 68
Further, the blocks themselves can be arranged in 2 dimensions inside the grid. So we will have gridDim.x and gridDim.y to denote the number of blocks inside the grid along the X and Y axis respectively as below.
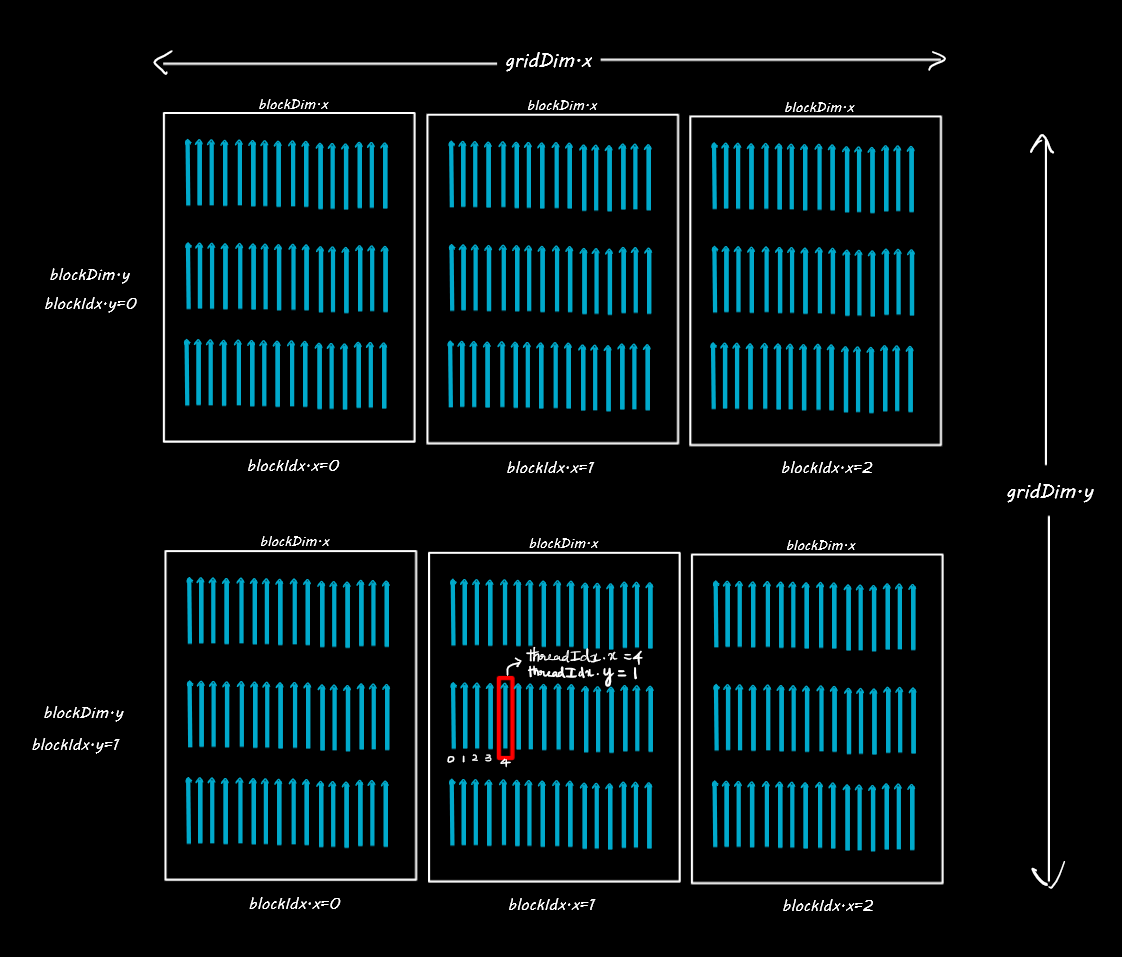
In this case gridDim.x=3 and gridDim.y=2.
4. Running CUDA Code
If you are using CUDA in your local machine (with Nvidia GPU) and want to run your code in jupyter environment, then you can use the nvcc4jupyter package and load the extension to start running CUDA code.
In the cells containing Cuda C/C++ code, you might need to add the %%cuda magic command.
python
!pip install nvcc4jupyter
python
Collecting nvcc4jupyter
  Downloading nvcc4jupyter-1.2.1-py3-none-any.whl.metadata (5.1 kB)
Downloading nvcc4jupyter-1.2.1-py3-none-any.whl (10 kB)
Installing collected packages: nvcc4jupyter
Successfully installed nvcc4jupyter-1.2.1
python
%load_ext nvcc4jupyter
python
Source files will be saved in "C:\Users\DELL\AppData\Local\Temp\tmpvr4t20qj".
We can then run the CUDA based code by adding the %%cuda magic in each cell.
C
%%cuda

#include <stdio.h>

__global__ void hello(){
    printf("Hello from block: %u, thread: %u\n", blockIdx.x, threadIdx.x);
}

__host__ int main(){
    hello<<<2, 2>>>();
    cudaDeviceSynchronize();
}
Compiling CUDA codes
This above method however has given problems that can happen when the GPU is not properly detected.
So alternately we can create the cuda codes in separate .cu files, compile them using nvcc command and finally execute the compiled file.
Let’s do all of this in Google Colab. You can upload / open this file in colab and continue the work.
For this the first step is to change the RUNTIME Type.
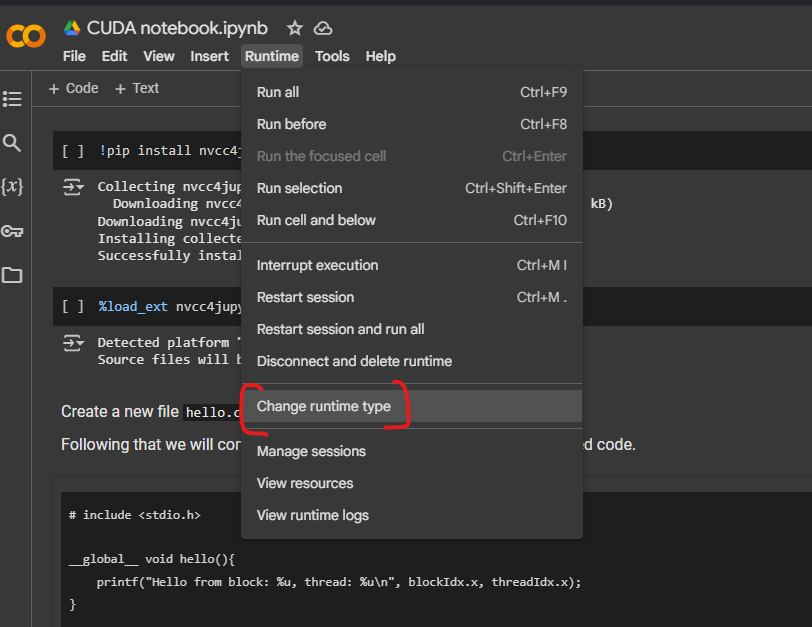
And then set the Runtime Type to ‘T4 GPU’ as shown.
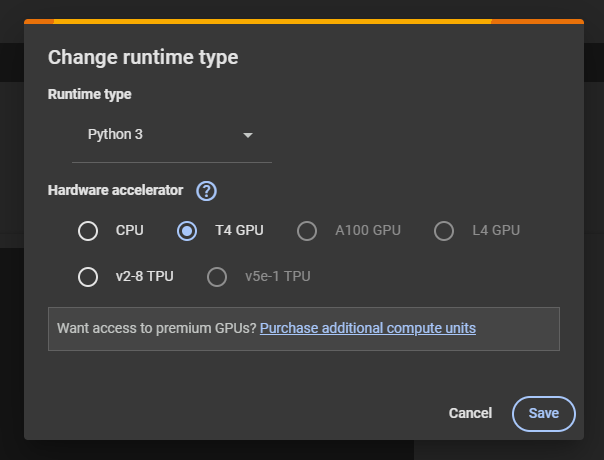
Remember, with Google colab, the .cu file we create will not be retained once the runtime gets reconnected, so better store the files.
Let’s now start writing cuda code.
Create a new file hello.cu with the following code contents.
Following that we will compile the code first and then execute the compiled code.
C
#include <stdio.h>

__global__ void hello(){
    printf("Hello from block: %u, thread: %u\n", blockIdx.x, threadIdx.x);
}

__host__ int main(){
    hello<<<2, 2>>>();
    cudaDeviceSynchronize();
}
In order to compile the code using nvcc, we need to use the right NDVIDIA
architecture.
Let’s run !nvidia-smi. This tells you what GPU model you have. For example, you might see an NVIDIA T4, K80, P100, or V100. Each of these corresponds to a specific compute capability.
python
!nvidia-smi
python
/bin/bash: line 1: nvidia-smi: command not found
This is important because, when you compile the code, you need to mention the correct architecture. In this case we have Tesla T4.
If your GPU doesn’t match the -arch=sm_xx you used, or if you’re using an older GPU that doesn’t support device-side printf (compute capability < 2.0), you won’t see output.
Here is a quick reference for many commonly encountered GPUs:
python
GeForce GTX 10 Series (Pascal): e.g., GTX 1080 → sm_61
Tesla K80 (Kepler) → sm_37
Tesla P100 (Pascal) → sm_60
Tesla V100 (Volta) → sm_70
Tesla T4 (Turing) → sm_75
Tesla A100 (Ampere) → sm_80
GeForce RTX 30 Series (Ampere): e.g., RTX 3090 → sm_86
Tesla L4 (Ada Lovelace) → sm_89
Ada Lovelace (e.g., RTX 4090) → sm_89 or sm_90 depending on model
Let’s now compile the code.
Note:
- If you’re on a different GPU with another compute capability, replace sm_75 with your GPU’s appropriate sm_xx.
If you omit -arch=sm_xx, nvcc usually picks a default, but specifying it explicitly ensures you have the right features (including device-side printf).
python
%%shell

nvcc -arch=sm_75 hello.cu -o hello_compiled
This will create a new file named hello_compiled. Then execute it as follows.
python
%%shell

./hello_compiled
python
Hello from block: 0, thread: 0
Hello from block: 0, thread: 1
Hello from block: 1, thread: 0
Hello from block: 1, thread: 1
We now know the block number and thread number, of each thread based on what we printed.
Let’s now go over what this code does.
C
//Contents of hello.cu
#include <stdio.h>

__global__ void hello(){
    printf("Hello from block: %u, thread: %u\n", blockIdx.x, threadIdx.x);
}

__host__ int main(){
    hello<<<2, 2>>>();
    cudaDeviceSynchronize();
}
The above code has 3 parts:
- Standard input/output header:
#include <stdio.h>. This allows use to use input/output functions such asprintf,scanf, etc. The kernel function, defined using the
__global__keyword.The host function, defined using
__host__(optional) keyword.
The code that needs to be executed by the GPU threads are defined by adding a __global__ specifier defining the kernel.
But what is the kernel?
The kernel defines the compute logic that each thread will perform.
Whereas, the __host__ is specifier for the main program to be run on the CPU host and is optional.
The void in void hello() implies the function hello does not return a value.
This function (hello) will be run on every thread on the GPU. Here, we simply print the block index and the thread index given by the built-in blockIdx.x and threadIdx.x respectively. The values of each variable is in-built in each thread.
Ok, now what does hello<<<2, 2>>>() do?
It describes the <
That means we will use 2 blocks with 2 threads per block.
Finally, cudaDeviceSynchronize(); will wait for the GPU to finish all the threads before accessing the host.
2d Blocks arrangement inside the Grid
Let’s now look at an example where there is a 2D grid of blocks, with each block holding 4 threads in a 2×2 arrangement.
The contents of hello_2d.cu file is below, where we define the blocks and thread arrangement as seen in the above picture.
C
// Contents of hello_2d.cu
#include <stdio.h>

__global__ void hello() {
    printf("Hello from block: (%u, %u), thread: (%u, %u)\n",
           blockIdx.x, blockIdx.y,
           threadIdx.x, threadIdx.y);
}

int main() {
    // Dimensions of the grid and blocks
    dim3 threadsPerBlock(2, 2);  // 2x2 threads in one block
    dim3 numBlocks(3,2); // 3x2 blocks in a grid

    // Start kernel
    hello<<<nBlocks, threadsPerBlock>>>();

    // Wait for GPU to finish
    cudaDeviceSynchronize();

    return 0;
}
Let’s compile and execute
python
%%shell

nvcc -arch=sm_75 hello_2d.cu -o hello_2d_compiled
./hello_2d_compiled
Output:
python
Hello from block: (2, 0), thread: (0, 0)
Hello from block: (2, 0), thread: (1, 0)
Hello from block: (2, 0), thread: (0, 1)
Hello from block: (2, 0), thread: (1, 1)
Hello from block: (0, 0), thread: (0, 0)
Hello from block: (0, 0), thread: (1, 0)
3d Blocks arrangement inside the Grid
Let’s also look at an example where the blocks are arranged in 3D, that is, a 2D layer of blocks stacked one above the other.
C
// Coontents of hello_3d.cu
#include <stdio.h>

__global__ void hello() {
    printf("Hello from block: (%u, %u, %u), thread: (%u, %u, %u)\n",
           blockIdx.x, blockIdx.y, blockIdx.z,
           threadIdx.x, threadIdx.y, threadIdx.z);
}

int main() {
    // Dimensions of the grid and blocks
    dim3 gridDim(2, 2, 2);   // 2x2x2 grid of blocks
    dim3 blockDim(2, 2, 2);  // 2x2x2 grid of threads per block

    // Start kernel
    hello<<<gridDim, blockDim>>>();

    // Wait for GPU to finish
    cudaDeviceSynchronize();

    return 0;
Let’s compile and execute.
python
%%shell

nvcc -arch=sm_75 hello_3d.cu -o hello_3d_compiled
./hello_3d_compiled
Output:
python
Hello from block: (0, 1, 0), thread: (0, 0, 0)
Hello from block: (0, 1, 0), thread: (1, 0, 0)
Hello from block: (0, 1, 0), thread: (0, 1, 0)
Hello from block: (0, 1, 0), thread: (1, 1, 0)
Hello from block: (0, 1, 0), thread: (0, 0, 1)
Hello from block: (0, 1, 0), thread: (1, 0, 1)
Hello from block: (0, 1, 0), thread: (0, 1, 1)
What is dim3?
dim3 is a CUDA / C / C++ datatype we can use to define the dimensions of the blocks and grid. That is, you can use it to define how the threads are arragned in each block and how the blocks are arranged in a grid.
You can define the thread arrangement and blocks arrangement in 3D, so can give 3 values (x,y,z).
5. Vector Addition Demo: Sending Data between Host and Device
Now that you know about defining the thread and block dimensions, let’s look at a basic vector addition example.
By doing this we will also learn about sending data from the host to the device and back.
So, here is what will happen.
We first define the kernel, which is the function each thread in the GPU device will execute. We have seen an example already.
But here, we execute the addition of a specific cell in the vector. To locate the position of the cell, we denote it using i whose value in this case equals threadIdx.x, because we will be using only one block as you will see in the upcoming steps.
Note, we will be discussing case of multiple blocks and how to computing i in such as case right after this.
C
// Kernel definition
__global__ void AddTwoVectors(float A[], float B[], float C[]) {
    int i = threadIdx.x;
    C[i] = A[i] + B[i];
}
Then we will define the host function main() where:
- We will define the vectors (
A,BandC) and the sizeNof the vectors. We are going to add element-by-element on the CPU host.
C
int N = 1000; // Size of the vectors
float A[N], B[N], C[N]; // Arrays for vectors A, B, and C
Let’s also initialize some values.
C
// Initialize vectors A and B
for (int i = 0; i < N; ++i) {
    A[i] = 2;
    B[i] = 5;
}
- Define the pointers (
*d_A,*d_B,*d_C) to the address of the host vectorsA,BandCon the device.
C
float *d_A, *d_B, *d_C; // Device pointers for vectors A, B, and C
- Then you need to allocate memory on the device to hold the vectors
A,BandC. You can do this usingcudaMalloc()as follows.
C
// Allocate memory on the device for vectors A, B, and C
  cudaMalloc((void **)&d_A, N * sizeof(float));
  cudaMalloc((void **)&d_B, N * sizeof(float));
  cudaMalloc((void **)&d_C, N * sizeof(float));
The first argument refers to the address of the pointer that will point to the allocated memory, whereas the second arg tells how much memory to allocate in bytes.
- With the memory allocated in the device, next step is to copy over the data (of the vectors) to the device.
C
// Copy vectors A and B from host to device
cudaMemcpy(d_A, A, N * sizeof(float), cudaMemcpyHostToDevice);
cudaMemcpy(d_B, B, N * sizeof(float), cudaMemcpyHostToDevice);
- Run the kernel. This step is executed on the device.
C
// Kernel invocation with N threads
AddTwoVectors<<<1, N>>>(d_A, d_B, d_C);
Once the kernel run is completed we typically wait for all the threads in the GPU device to complete execution. You can do this using cudaDeviceSynchronize().
C
cudaDeviceSynchronize();
- With the results now computed, the resulting vector
Cis ready. You can copy it back to the host.
python
// Copy vector C from device to host
cudaMemcpy(C, d_C, N * sizeof(float), cudaMemcpyDeviceToHost);
Finally, free the device memory we allocated earlier (using cudaMalloc). You can do this using cudaFree.
C
cudaFree(d_A);
cudaFree(d_B);
cudaFree(d_C);
Putting it altogether as one code:
C
// Contents of AddTwoVectors.cu
#include <stdio.h>

// Kernel definition
__global__ void AddTwoVectors(float A[], float B[], float C[]) {
    int i = threadIdx.x;
    C[i] = A[i] + B[i];
}

int main() {

    int N = 1000; // Size of the vectors
    float A[N], B[N], C[N]; // Arrays for vectors A, B, and C

    // Initialize vectors A and B
    for (int i = 0; i < N; ++i) {
        A[i] = 1;
        B[i] = 3;
    }

    float *d_A, *d_B, *d_C; // Device pointers for vectors A, B, and C

    // Allocate memory on the device for vectors A, B, and C
    cudaMalloc((void **)&d_A, N * sizeof(float));
    cudaMalloc((void **)&d_B, N * sizeof(float));
    cudaMalloc((void **)&d_C, N * sizeof(float));

    // Copy vectors A and B from host to device
    cudaMemcpy(d_A, A, N * sizeof(float), cudaMemcpyHostToDevice);
    cudaMemcpy(d_B, B, N * sizeof(float), cudaMemcpyHostToDevice);

    // Kernel invocation with N threads
    AddTwoVectors<<<1, N>>>(d_A, d_B, d_C);

    // Check for error
    cudaError_t error = cudaGetLastError();
    if(error != cudaSuccess) {
        printf("CUDA error: %s\n", cudaGetErrorString(error));
        exit(-1);
    }

    // Waits untill all CUDA threads are executed
    cudaDeviceSynchronize();

    // Copy vector C from device to host
    cudaMemcpy(C, d_C, N * sizeof(float), cudaMemcpyDeviceToHost);

    // Free device memory
    cudaFree(d_A);
    cudaFree(d_B);
    cudaFree(d_C);

    // Print first 10 outputs.
    for (int i = 0; i < 10; ++i) {
      printf("%f \n", C[i]);
    }
}
Notice the cudaGetLastError(), once the kernel has executed, we check if there were any errors. If found, we will print it out.
python
%%shell
nvcc addTwoVectors.cu -o addTwoVectors_compiled
./addTwoVectors_compiled
python
4.000000
4.000000
4.000000
4.000000
4.000000
4.000000
4.000000
4.000000
4.000000
4.000000
6. Dynamic allocation of number of threads
The above example works fine and giving the correct output as expected. But, what happens if the number of elements in the array further increases to a large number?
It errors out, saying the kernel died.
Try changing ‘N’ to a very large number in in the above code and run it. See what happens.
To avoid such errors, we need an automatic way of finding the maximum number of threads a block in given GPU can hold and then use that to set the block and threads configuration when we call the kernel.
So, let’s define the function that will get the maximum threads per block.
C
#include <stdio.h>
#include <math.h>

int maxThreadsperblock()
{
    // current CUDA device ID
    int device;

    // object to store properties of the CUDA device
    cudaDeviceProp props;

    // ID of the currently active CUDA device
    cudaGetDevice(&device);

    // Retrieve properties and store in 'props'
    cudaGetDeviceProperties(&props, device);

    // Return max number of threads per block
    return props.maxThreadsPerBlock;
}
We can now use maxThreadsperblock() to get the maximum number of threads a block in the active GPU device can hold. Then use that to determine the number of blocks required to perform the computations.
How to get the number of blocks?
Divide the vector size (or the number of computations that need to happen simultaneously) by maxThreadsperblock and round it up.
C
int nThreads = maxThreadsperblock();
int nBlocks = ceil((double)n / nThreads);

// Call kernel
AddTwoVectors<<<nBlocks, nThreads>>>(d_A, d_B, d_C);
Good.
So, now that we could have more than 1 block, what should be the value of i in the addition: C[i] = A[i] + B[i]?
Btw, i refers to the index inside the vector of the elements we want to add. It can take the values from 0 to N-1.
It cannot be just i = threadIdx.x like we used before, because i can overflow the number of threads in the first blow.
So, we need to caluculate i using the both blockIdx.x and threadIdx.x as follows:
int i = blockIdx.x * blockDim.x + threadIdx.x
Here’s the full code:
C
#include <stdio.h>
#include <math.h>

__global__ void AddTwoVectors(float A[], float B[], float C[]) {
    int i = blockIdx.x * blockDim.x + threadIdx.x;

    if (i < N)  // i doesn't exceed array length
        C[i] = A[i] + B[i];
}

int maxThreadsperblock()
{
    // current CUDA device ID
    int device;

    // object to store properties of the CUDA device
    cudaDeviceProp props;

    // ID of the currently active CUDA device
    cudaGetDevice(&device);

    // Retrieve properties and store in 'props'
    cudaGetDeviceProperties(&props, device);

    // Return max number of threads per block
    return props.maxThreadsPerBlock;
}

int main() {

    int N = 100000; // Size of the vectors
    float A[N], B[N], C[N]; // Arrays for vectors A, B, and C

    // Initialize vectors A and B
    for (int i = 0; i < N; ++i) {
        A[i] = 1;
        B[i] = 3;
    }

    float *d_A, *d_B, *d_C; // Device pointers for vectors A, B, and C

    // Allocate memory on the device for vectors A, B, and C
    cudaMalloc((void **)&d_A, N * sizeof(float));
    cudaMalloc((void **)&d_B, N * sizeof(float));
    cudaMalloc((void **)&d_C, N * sizeof(float));

    // Copy vectors A and B from host to device
    cudaMemcpy(d_A, A, N * sizeof(float), cudaMemcpyHostToDevice);
    cudaMemcpy(d_B, B, N * sizeof(float), cudaMemcpyHostToDevice);

    int nThreads = maxThreadsperblock();
    int nBlocks = ceil((double)n / nThreads);

    // Kernel invocation with N threads
    AddTwoVectors<<<nBlocks, nThreads>>>(d_A, d_B, d_C);

    // Check for error
    cudaError_t error = cudaGetLastError();
    if(error != cudaSuccess) {
        printf("CUDA error: %s\n", cudaGetErrorString(error));
        exit(-1);
    }

    // Waits untill all CUDA threads are executed
    cudaDeviceSynchronize();

    // Copy vector C from device to host
    cudaMemcpy(C, d_C, N * sizeof(float), cudaMemcpyDeviceToHost);

    // Free device memory
    cudaFree(d_A);
    cudaFree(d_B);
    cudaFree(d_C);

    // Print first 10 outputs.
    for (int i = 0; i < 10; ++i) {
      printf("%f \n", C[i]);
    }

    return 0;
}
7. Multi Dimensional Operations
So far we have been working on vectors, using one dimensional blocks. But, in deep learning and other scientific applications you will need to work on matrices and higher dimensions as well.
So, let’s not see how to handle 3D operations. Ofcourse, we will use the dim3 objects using which we can define:
- Number of blocks: the arrangement of blocks in a grid.
- Number of threads: The arrangement of threads in a block.
Let’s suppose we have two NxN square matrices A[N][N] and B[N][N]. We want to add their corresponding elements and store it in another square matrix C[N][N].
Here any element in the matrix A may be represented as A[i][j] where i is the row number and j is the column number.
Assuming there is only 1 block, containing NxN threads inside, we can perform the addition in each thread as follows:
C
#include <stdio.h>

// Kernel definition
__global__ void AddTwoMatrices(float A[N][N], float B[N][N], float C[N][N]) {
    int i = threadIdx.x;
    int j = threadIdx.y;
    C[i][j] = A[i][j] + B[i][j];
}

int main() {
    ...
    // Kernel invocation with 1 block of NxN threads
    dim3 threads_per_block(N, N);
    AddTwoMatrices<<<1, threads_per_block>>>(A, B, C);
    ...
}
But what happens if the dimensions of the matrix exceeds the maximum number of threads a block can hold?
We have to be calculative here.
You can compute the row index i and column index j of the matrix as follows:
C
int i = blockIdx.x * blockDim.x + threadIdx.x;
int j = blockIdx.y * blockDim.y + threadIdx.y;
That is, i equals the number of threads in all the prior blocks given by (blockIdx.x * blockDim.x) plus the index position in the current thread (threadIdx.x).
Similar logic applied for the column index j.
Next we need to calculate the number of blocks as well, in a similar logic as we did before. But this time in 2D as follows:
C
#include <stdio.h>

// Kernel definition
__global__ void AddTwoMatrices(float A[N][N], float B[N][N], float C[N][N]) {
    int i = blockIdx.x * blockDim.x + threadIdx.x;
    int j = blockIdx.y * blockDim.y + threadIdx.y;
    if (i < N && j < N) {
        C[i][j] = A[i][j] + B[i][j];
    }
}

int main() {
    ...
    // Kernel invocation with 1 block of NxN threads
    dim3 threads_per_block(32, 32);
    dim3 number_of_blocks((N + threads_per_block.x - 1) ∕ threads_per_block.x, (N + threads_per_block.y - 1) ∕ threads_per_block.y);
    AddTwoMatrices<<<number_of_blocks, threads_per_block>>>(A, B, C);
    ...
}
These ideas form the central piece behind CUDA programming.
ML Engineers have been performing GPU operations using CUDA behind the scenes when you use frameworks like PyTorch.
I hope this gives a fair idea of the mechanics behind GPU programming behind CUDA.
If you wish to explore further, here are few nice resources to continue your learning.
Resources:
Free Course
Master Core Python — Your First Step into AI/ML
Build a strong Python foundation with hands-on exercises designed for aspiring Data Scientists and AI/ML Engineers.
Start Free Course →Trusted by 50,000+ learners
Related Course
Master Deployment — Hands-On
Join 5,000+ students at edu.machinelearningplus.com
Explore Course
Related Articles