machine learning +
LLM Temperature, Top-P, and Top-K Explained — With Python Simulations
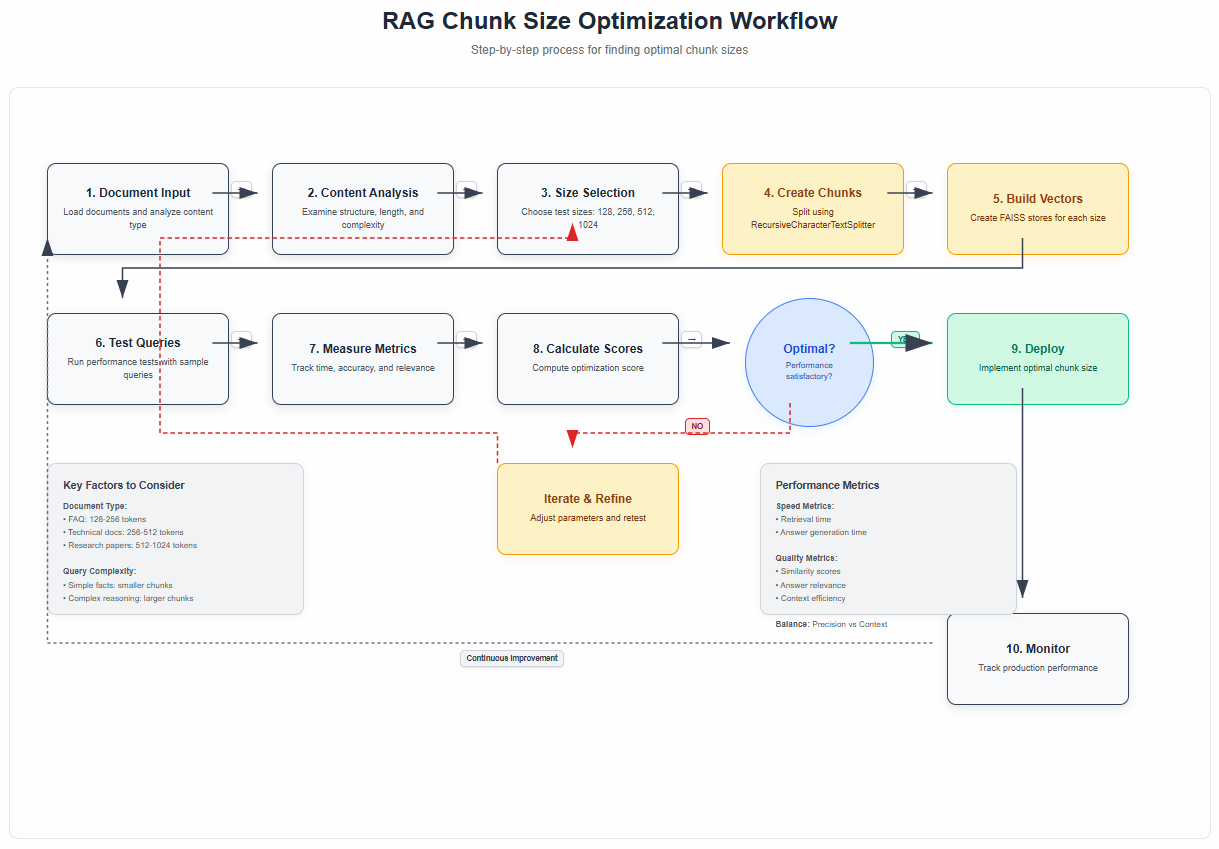
Optimizing RAG Chunk Size: Your Definitive Guide to Better Retrieval Accuracy
Optimal chunk size for RAG systems typically ranges from 128-512 tokens, with smaller chunks (128-256 tokens) excelling at precise fact-based queries while larger chunks (256-512 tokens) provide better context for complex reasoning tasks. The key is balancing retrieval precision with context retention based on your specific use case.
Optimal chunk size for RAG systems typically ranges from 128-512 tokens, with smaller chunks (128-256 tokens) excelling at precise fact-based queries while larger chunks (256-512 tokens) provide better context for complex reasoning tasks. The key is balancing retrieval precision with context retention based on your specific use case.
Ever built a RAG system that gave you frustratingly vague answers or missed obvious connections in your documents? You spend hours perfecting your prompts and fine-tuning your model, but the real problem might be hiding in plain sight: your chunk size.
Think of chunk size as the lens through which your AI sees your documents. Too narrow, and it misses the big picture. Too wide, and it can’t focus on what matters. Getting this right can transform a mediocre RAG system into one that genuinely understands and retrieves exactly what you need.
Let me walk you through everything you need to know about chunk size optimization, complete with practical code you can run in your Jupyter notebook.
1. Understanding the Chunk Size Problem
Here’s what happens when you get chunk size wrong:
Too Small (Under 128 tokens): Your system becomes like a person who can only remember individual sentences. It might find the exact fact you need, but it loses the context that makes that fact meaningful.
Too Large (Over 1024 tokens): Your system becomes like someone who tells you their entire life story when you ask what time it is. The relevant information gets buried in noise.
The research is clear: a chunk size of 1024 might strike an optimal balance between response time and the quality of the responses, measured in terms of faithfulness and relevancy, but this depends heavily on your specific use case.
2. The Science Behind Optimal Chunk Sizes
Recent studies have shown some interesting patterns. Common practices suggest chunks between 128–512 tokens. Smaller chunks (e.g., 128–256 tokens) work well for fact-based queries where precise keyword matching matters, while larger chunks (256–512 tokens) are better for tasks requiring broader context.
Why does this matter? The retrieved chunks will be fed directly into the prompt as context for your LLM to generate a response. This means that at the very minimum, the total length of all of the retrieved chunks combined cannot exceed the context window of the LLM.
The original RAG paper by Lewis et al. (2020) introduced this concept, but didn’t provide specific guidance on chunking strategies – that’s something the community has developed through extensive experimentation.
3. Setting Up Your Testing Environment
Let’s start with the practical stuff. You’ll need these packages installed:
bash
pip install langchain openai faiss-cpu python-dotenv tiktoken pypdf pandas matplotlib seaborn
Now let’s set up our imports and environment:
python
import os
from dotenv import load_dotenv
import pandas as pd
import matplotlib.pyplot as plt
import seaborn as sns
from langchain_openai import ChatOpenAI, OpenAIEmbeddings
from langchain.text_splitter import RecursiveCharacterTextSplitter, TokenTextSplitter
from langchain_community.document_loaders import PyPDFLoader, TextLoader
from langchain_community.vectorstores import FAISS
from langchain.prompts import PromptTemplate
import time
import numpy as np

# Load environment variables
load_dotenv()
os.environ["OPENAI_API_KEY"] = os.getenv('OPENAI_API_KEY')

# Set up matplotlib for better plots
plt.style.use('seaborn-v0_8')
sns.set_palette("husl")
4. Loading Your Test Documents
For this experiment, we’ll use a sample document. You can use any PDF or text file you have:
python
# Load your document
document_path = "your_document.pdf"  # Replace with your document path

try:
    if document_path.endswith('.pdf'):
        loader = PyPDFLoader(document_path)
    else:
        loader = TextLoader(document_path)

    raw_documents = loader.load()
    print(f"Loaded {len(raw_documents)} document sections")

except FileNotFoundError:
    # If you don't have a document, let's create sample text
    print("Creating sample text for demonstration...")
    sample_text = """
    Machine learning is a subset of artificial intelligence that focuses on the development of algorithms and statistical models that enable computers to improve their performance on a specific task through experience. The field has evolved significantly since its inception in the 1950s, with major breakthroughs in neural networks, deep learning, and reinforcement learning.

    Deep learning, in particular, has revolutionized many areas of machine learning by using artificial neural networks with multiple layers to model and understand complex patterns in data. These networks can automatically discover representations from raw data, eliminating the need for manual feature engineering in many applications.

    Natural language processing (NLP) is another crucial area where machine learning has made significant strides. Modern NLP systems can understand, interpret, and generate human language with remarkable accuracy, enabling applications like machine translation, sentiment analysis, and conversational AI.

    The applications of machine learning span across various industries, including healthcare, finance, transportation, and entertainment. In healthcare, ML algorithms help in medical diagnosis, drug discovery, and personalized treatment plans. In finance, they're used for fraud detection, algorithmic trading, and risk assessment.
    """

    from langchain.schema import Document
    raw_documents = [Document(page_content=sample_text, metadata={"source": "sample"})]

print(f"Total text length: {len(raw_documents[0].page_content)} characters")
5. Creating Your Chunk Size Testing Framework
Here’s where we get scientific about it. We’ll test different chunk sizes and measure their performance:
python
def create_chunks_with_different_sizes(documents, chunk_sizes, overlap_ratio=0.1):
    """
    Create chunks using different sizes for comparison
    """
    all_chunked_docs = {}

    for size in chunk_sizes:
        overlap = int(size * overlap_ratio)  # 10% overlap by default

        splitter = RecursiveCharacterTextSplitter(
            chunk_size=size,
            chunk_overlap=overlap,
            separators=["\n\n", "\n", " ", ""]
        )

        chunks = splitter.split_documents(documents)
        all_chunked_docs[size] = chunks

        print(f"Chunk size {size}: Created {len(chunks)} chunks")

    return all_chunked_docs

# Test different chunk sizes
chunk_sizes_to_test = [128, 256, 512, 1024]
chunked_documents = create_chunks_with_different_sizes(raw_documents, chunk_sizes_to_test)
Let’s analyze the chunk distribution:
python
def analyze_chunk_statistics(chunked_docs):
    """
    Analyze statistics for different chunk sizes
    """
    stats_data = []

    for size, chunks in chunked_docs.items():
        chunk_lengths = [len(chunk.page_content) for chunk in chunks]

        stats_data.append({
            'chunk_size': size,
            'num_chunks': len(chunks),
            'avg_length': np.mean(chunk_lengths),
            'min_length': np.min(chunk_lengths),
            'max_length': np.max(chunk_lengths),
            'std_length': np.std(chunk_lengths)
        })

    return pd.DataFrame(stats_data)

chunk_stats = analyze_chunk_statistics(chunked_documents)
print("Chunk Statistics:")
print(chunk_stats.round(2))
6. Building Vector Stores for Each Chunk Size
Now let’s create vector stores for each chunk size to test retrieval performance:
python
def create_vector_stores(chunked_docs):
    """
    Create FAISS vector stores for each chunk size
    """
    embeddings = OpenAIEmbeddings()
    vector_stores = {}

    for size, chunks in chunked_docs.items():
        print(f"Creating vector store for chunk size {size}...")

        # Create vector store
        vector_store = FAISS.from_documents(
            documents=chunks,
            embedding=embeddings
        )

        vector_stores[size] = vector_store
        print(f"✓ Vector store created with {len(chunks)} chunks")

    return vector_stores

vector_stores = create_vector_stores(chunked_documents)
7. Performance Testing Framework
Let’s create a comprehensive testing framework to evaluate different chunk sizes:
python
def evaluate_chunk_size_performance(vector_stores, test_queries, k=3):
    """
    Evaluate retrieval performance for different chunk sizes
    """
    results = []

    for query in test_queries:
        print(f"\nTesting query: '{query[:50]}...'")

        for chunk_size, vector_store in vector_stores.items():
            start_time = time.time()

            # Retrieve documents
            docs = vector_store.similarity_search(query, k=k)

            retrieval_time = time.time() - start_time

            # Calculate metrics
            total_chars = sum(len(doc.page_content) for doc in docs)
            avg_relevance_score = sum(
                vector_store.similarity_search_with_score(query, k=k)[i][1]
                for i in range(min(k, len(docs)))
            ) / min(k, len(docs))

            results.append({
                'query': query,
                'chunk_size': chunk_size,
                'retrieval_time': retrieval_time,
                'total_retrieved_chars': total_chars,
                'avg_chunk_length': total_chars / len(docs) if docs else 0,
                'num_chunks_retrieved': len(docs),
                'avg_similarity_score': avg_relevance_score
            })

    return pd.DataFrame(results)

# Define test queries
test_queries = [
    "What is machine learning?",
    "How does deep learning work?",
    "What are the applications of ML in healthcare?",
    "Explain natural language processing"
]

# Run performance evaluation
performance_results = evaluate_chunk_size_performance(vector_stores, test_queries)
print("\nPerformance Results:")
print(performance_results.groupby('chunk_size').agg({
    'retrieval_time': 'mean',
    'avg_similarity_score': 'mean',
    'avg_chunk_length': 'mean'
}).round(4))
8. Advanced Evaluation with Question-Answer Testing
Let’s take it a step further and test actual answer quality:
python
def evaluate_answer_quality(vector_stores, test_questions, llm_model=None):
    """
    Evaluate answer quality for different chunk sizes
    """
    if llm_model is None:
        llm_model = ChatOpenAI(temperature=0, model_name="gpt-4o-mini")

    qa_prompt = PromptTemplate(
        input_variables=["context", "question"],
        template="""Based on the following context, answer the question concisely and accurately:

Context:
{context}

Question: {question}

Answer:"""
    )

    results = []

    for question in test_questions:
        print(f"\nEvaluating: {question}")

        for chunk_size, vector_store in vector_stores.items():
            # Retrieve relevant chunks
            docs = vector_store.similarity_search(question, k=3)
            context = "\n\n".join([doc.page_content for doc in docs])

            # Generate answer
            start_time = time.time()
            chain = qa_prompt | llm_model
            response = chain.invoke({"context": context, "question": question})
            answer_time = time.time() - start_time

            results.append({
                'question': question,
                'chunk_size': chunk_size,
                'answer': response.content,
                'context_length': len(context),
                'answer_time': answer_time,
                'num_chunks_used': len(docs)
            })

    return pd.DataFrame(results)

# Test with specific questions
test_questions = [
    "What is the main difference between machine learning and deep learning?",
    "Name three applications of machine learning in healthcare."
]

qa_results = evaluate_answer_quality(vector_stores, test_questions)

# Display results for each chunk size
for size in chunk_sizes_to_test:
    print(f"\n{'='*50}")
    print(f"CHUNK SIZE: {size}")
    print(f"{'='*50}")

    size_results = qa_results[qa_results['chunk_size'] == size]

    for _, row in size_results.iterrows():
        print(f"\nQ: {row['question']}")
        print(f"A: {row['answer']}")
        print(f"Context length: {row['context_length']} chars | Time: {row['answer_time']:.2f}s")
9. Visualizing Your Results
Let’s create some useful visualizations to understand the trade-offs:
python
def create_performance_visualizations(performance_df, qa_df):
    """
    Create visualizations for chunk size performance analysis
    """
    fig, axes = plt.subplots(2, 2, figsize=(15, 12))
    fig.suptitle('Chunk Size Performance Analysis', fontsize=16, fontweight='bold')

    # 1. Retrieval Time vs Chunk Size
    avg_times = performance_df.groupby('chunk_size')['retrieval_time'].mean()
    axes[0, 0].bar(avg_times.index, avg_times.values, color='skyblue', alpha=0.7)
    axes[0, 0].set_title('Average Retrieval Time by Chunk Size')
    axes[0, 0].set_xlabel('Chunk Size')
    axes[0, 0].set_ylabel('Time (seconds)')

    # 2. Similarity Scores vs Chunk Size
    avg_scores = performance_df.groupby('chunk_size')['avg_similarity_score'].mean()
    axes[0, 1].bar(avg_scores.index, avg_scores.values, color='lightgreen', alpha=0.7)
    axes[0, 1].set_title('Average Similarity Score by Chunk Size')
    axes[0, 1].set_xlabel('Chunk Size')
    axes[0, 1].set_ylabel('Similarity Score')

    # 3. Context Length Distribution
    qa_df.boxplot(column='context_length', by='chunk_size', ax=axes[1, 0])
    axes[1, 0].set_title('Context Length Distribution by Chunk Size')
    axes[1, 0].set_xlabel('Chunk Size')
    axes[1, 0].set_ylabel('Context Length (characters)')

    # 4. Answer Generation Time
    avg_answer_times = qa_df.groupby('chunk_size')['answer_time'].mean()
    axes[1, 1].bar(avg_answer_times.index, avg_answer_times.values, color='salmon', alpha=0.7)
    axes[1, 1].set_title('Average Answer Generation Time')
    axes[1, 1].set_xlabel('Chunk Size')
    axes[1, 1].set_ylabel('Time (seconds)')

    plt.tight_layout()
    plt.show()

# Create the visualizations
create_performance_visualizations(performance_results, qa_results)
10. Finding Your Optimal Chunk Size
Now let’s create a systematic approach to find the best chunk size for your specific use case:
python
def calculate_optimization_score(performance_df, qa_df, weights=None):
    """
    Calculate a composite optimization score for each chunk size
    """
    if weights is None:
        weights = {
            'retrieval_speed': 0.2,      # Faster is better
            'answer_speed': 0.2,         # Faster is better
            'similarity_score': 0.3,     # Higher is better
            'context_efficiency': 0.3    # Lower context for same info is better
        }

    # Aggregate metrics by chunk size
    perf_agg = performance_df.groupby('chunk_size').agg({
        'retrieval_time': 'mean',
        'avg_similarity_score': 'mean'
    }).reset_index()

    qa_agg = qa_df.groupby('chunk_size').agg({
        'answer_time': 'mean',
        'context_length': 'mean'
    }).reset_index()

    # Merge dataframes
    merged = perf_agg.merge(qa_agg, on='chunk_size')

    # Normalize metrics (0-1 scale)
    merged['retrieval_speed_norm'] = 1 - (merged['retrieval_time'] - merged['retrieval_time'].min()) / (merged['retrieval_time'].max() - merged['retrieval_time'].min())
    merged['answer_speed_norm'] = 1 - (merged['answer_time'] - merged['answer_time'].min()) / (merged['answer_time'].max() - merged['answer_time'].min())
    merged['similarity_norm'] = (merged['avg_similarity_score'] - merged['avg_similarity_score'].min()) / (merged['avg_similarity_score'].max() - merged['avg_similarity_score'].min())
    merged['context_eff_norm'] = 1 - (merged['context_length'] - merged['context_length'].min()) / (merged['context_length'].max() - merged['context_length'].min())

    # Calculate composite score
    merged['optimization_score'] = (
        merged['retrieval_speed_norm'] * weights['retrieval_speed'] +
        merged['answer_speed_norm'] * weights['answer_speed'] +
        merged['similarity_norm'] * weights['similarity_score'] +
        merged['context_eff_norm'] * weights['context_efficiency']
    )

    return merged.sort_values('optimization_score', ascending=False)

# Calculate optimization scores
optimization_results = calculate_optimization_score(performance_results, qa_results)

print("Chunk Size Optimization Results:")
print("=" * 50)
for _, row in optimization_results.iterrows():
    print(f"Chunk Size: {int(row['chunk_size'])}")
    print(f"  Optimization Score: {row['optimization_score']:.3f}")
    print(f"  Avg Retrieval Time: {row['retrieval_time']:.4f}s")
    print(f"  Avg Similarity Score: {row['avg_similarity_score']:.4f}")
    print(f"  Avg Context Length: {int(row['context_length'])} chars")
    print("-" * 30)

best_chunk_size = int(optimization_results.iloc[0]['chunk_size'])
print(f"\nRECOMMENDED CHUNK SIZE: {best_chunk_size}")
11. Advanced Chunking Strategies
Beyond just changing size, let’s explore different chunking strategies:
python
def test_different_chunking_strategies(documents, chunk_size=512):
    """
    Test different chunking strategies with the same chunk size
    """
    strategies = {}

    # 1. Recursive Character Text Splitter (default)
    recursive_splitter = RecursiveCharacterTextSplitter(
        chunk_size=chunk_size,
        chunk_overlap=int(chunk_size * 0.1),
        separators=["\n\n", "\n", " ", ""]
    )
    strategies['recursive'] = recursive_splitter.split_documents(documents)

    # 2. Token-based splitting
    token_splitter = TokenTextSplitter(
        chunk_size=chunk_size,
        chunk_overlap=int(chunk_size * 0.1)
    )
    strategies['token'] = token_splitter.split_documents(documents)

    # 3. Sentence-based chunking (approximate)
    sentence_splitter = RecursiveCharacterTextSplitter(
        chunk_size=chunk_size,
        chunk_overlap=int(chunk_size * 0.15),  # More overlap for sentences
        separators=[". ", "! ", "? ", "\n\n", "\n", " "]
    )
    strategies['sentence'] = sentence_splitter.split_documents(documents)

    return strategies

# Test different strategies
chunking_strategies = test_different_chunking_strategies(raw_documents, best_chunk_size)

print("Chunking Strategy Comparison:")
for strategy, chunks in chunking_strategies.items():
    avg_length = np.mean([len(chunk.page_content) for chunk in chunks])
    print(f"{strategy.capitalize()}: {len(chunks)} chunks, avg length: {avg_length:.0f} chars")
12. Building Your Production-Ready Chunking Function
Based on our analysis, let’s create a production-ready chunking function:
python
def create_optimized_chunks(documents, chunk_size=None, strategy='adaptive'):
    """
    Create optimized chunks based on document analysis
    """
    if chunk_size is None:
        chunk_size = best_chunk_size  # Use our optimized size

    if strategy == 'adaptive':
        # Analyze document to choose best strategy
        total_length = sum(len(doc.page_content) for doc in documents)

        if total_length < 10000:  # Short documents
            overlap_ratio = 0.15
            separators = ["\n\n", "\n", ". ", " "]
        else:  # Long documents
            overlap_ratio = 0.1
            separators = ["\n\n", "\n", " ", ""]

    elif strategy == 'precise':
        # For fact-based retrieval
        chunk_size = min(chunk_size, 256)
        overlap_ratio = 0.05
        separators = [". ", "! ", "? ", "\n\n", "\n", " "]

    elif strategy == 'contextual':
        # For reasoning-heavy tasks
        chunk_size = max(chunk_size, 512)
        overlap_ratio = 0.15
        separators = ["\n\n", "\n", " "]

    else:  # 'standard'
        overlap_ratio = 0.1
        separators = ["\n\n", "\n", " ", ""]

    splitter = RecursiveCharacterTextSplitter(
        chunk_size=chunk_size,
        chunk_overlap=int(chunk_size * overlap_ratio),
        separators=separators
    )

    chunks = splitter.split_documents(documents)

    print(f"Created {len(chunks)} chunks using {strategy} strategy")
    print(f"Chunk size: {chunk_size}, Overlap: {int(chunk_size * overlap_ratio)}")

    return chunks

# Test the optimized chunking function
optimized_chunks = create_optimized_chunks(raw_documents, strategy='adaptive')

# Create final vector store with optimized chunks
final_embeddings = OpenAIEmbeddings()
final_vector_store = FAISS.from_documents(
    documents=optimized_chunks,
    embedding=final_embeddings
)

print(f" Final optimized vector store created with {len(optimized_chunks)} chunks")
13. Real-World Optimization Tips
Here are the key insights from our analysis and current research:
For FAQ Systems: Use smaller chunks (128-256 tokens) with sentence-based splitting. Strategies like sentence-based chunking or keyword-based chunking can work well for quick, precise answers.
For Technical Documentation: Use medium chunks (256-512 tokens) with recursive splitting to maintain code examples and explanations together.
For Research Papers: Use larger chunks (512-1024 tokens) with paragraph-based splitting to preserve academic arguments and citations.
For Mixed Content: Use adaptive chunking that adjusts based on content type detection.
python
def get_recommended_chunk_size(document_type, query_complexity='medium'):
    """
    Get recommended chunk size based on document type and query complexity
    """
    recommendations = {
        'faq': {'simple': 128, 'medium': 256, 'complex': 384},
        'technical_docs': {'simple': 256, 'medium': 512, 'complex': 768},
        'research_papers': {'simple': 384, 'medium': 768, 'complex': 1024},
        'mixed_content': {'simple': 256, 'medium': 512, 'complex': 768},
        'code_docs': {'simple': 200, 'medium': 400, 'complex': 600}
    }

    return recommendations.get(document_type, {}).get(query_complexity, 512)

# Example usage
print("Recommended chunk sizes:")
for doc_type in ['faq', 'technical_docs', 'research_papers']:
    for complexity in ['simple', 'medium', 'complex']:
        size = get_recommended_chunk_size(doc_type, complexity)
        print(f"{doc_type.replace('_', ' ').title()} + {complexity}: {size} tokens")
14. Monitoring and Continuous Optimization
Finally, let’s set up monitoring for your production system:
python
def create_chunk_monitoring_dashboard(vector_store, test_queries):
    """
    Create a monitoring system for chunk performance
    """
    metrics = []

    for query in test_queries:
        start_time = time.time()
        results = vector_store.similarity_search_with_score(query, k=5)
        retrieval_time = time.time() - start_time

        if results:
            avg_score = np.mean([score for _, score in results])
            chunk_lengths = [len(doc.page_content) for doc, _ in results]

            metrics.append({
                'query': query,
                'retrieval_time': retrieval_time,
                'avg_similarity': avg_score,
                'avg_chunk_length': np.mean(chunk_lengths),
                'total_context': sum(chunk_lengths),
                'timestamp': time.time()
            })

    return pd.DataFrame(metrics)

# Set up monitoring
monitoring_queries = [
    "What is the main concept?",
    "How does this work?",
    "What are the benefits?",
    "Are there any limitations?"
]

baseline_metrics = create_chunk_monitoring_dashboard(final_vector_store, monitoring_queries)

print("Baseline Performance Metrics:")
print(f"Average retrieval time: {baseline_metrics['retrieval_time'].mean():.4f}s")
print(f"Average similarity score: {baseline_metrics['avg_similarity'].mean():.4f}")
print(f"Average chunk length: {baseline_metrics['avg_chunk_length'].mean():.0f} chars")

def performance_alert(current_metrics, baseline_metrics, threshold=0.2):
    """
    Alert if performance degrades significantly
    """
    current_avg_time = current_metrics['retrieval_time'].mean()
    baseline_avg_time = baseline_metrics['retrieval_time'].mean()

    if current_avg_time > baseline_avg_time * (1 + threshold):
        print(f"ALERT: Retrieval time increased by {((current_avg_time/baseline_avg_time - 1) * 100):.1f}%")
        return True

    return False

# Example of how to use monitoring
print("\n Set up this monitoring in your production system to track performance over time.")
Key Takeaways
The Bottom Line: There’s no universal value, but common practices suggest chunks between 128–512 tokens. Your optimal chunk size depends on:
- Document Type: Technical docs need different chunking than FAQs
- Query Complexity: Simple facts vs. complex reasoning tasks
- Response Requirements: Speed vs. comprehensiveness
- Computational Constraints: Embedding model limits and costs
Start Here: Begin with 256 tokens for most use cases, then optimize based on your specific performance metrics.
Keep Testing: Invest the time to meticulously evaluate and adjust your chunk size for unmatched results. What works for one domain might not work for another.
Remember, chunk size optimization is not a one-time task. As your document collection grows and user needs evolve, keep monitoring and adjusting. The code we’ve built gives you the foundation to continuously optimize your RAG system for the best possible performance.
Your users will notice the difference when your AI starts giving more precise, contextual, and useful answers. And you’ll have the satisfaction of knowing your system is running at peak efficiency.
Based on research from Lewis et al. (2020) “Retrieval-Augmented Generation for Knowledge-Intensive NLP Tasks” and recent studies from LlamaIndex, Unstructured AI, and the broader RAG research community.
Free Course
Master Core Python — Your First Step into AI/ML
Build a strong Python foundation with hands-on exercises designed for aspiring Data Scientists and AI/ML Engineers.
Start Free Course →Trusted by 50,000+ learners
Related Course
Master Gen AI — Hands-On
Join 5,000+ students at edu.machinelearningplus.com
Explore Course

