machine learning +
LLM Temperature, Top-P, and Top-K Explained — With Python Simulations
Build a Simple RAG System with CSV Files: Step-by-Step Guide for Beginners
Learn how to build a Simple RAG system using CSV files by converting structured data into embeddings for more accurate, AI-powered question answering.
RAG (Retrieval-Augmented Generation) with CSV files transforms your spreadsheet data into an intelligent question-answering system that can understand and respond to natural language queries about your data. Instead of manually searching through rows and columns, you can ask questions like “What were our top-performing products last quarter?” and get instant, contextual answers powered by AI.
Think about it – you probably have tons of valuable data sitting in CSV files right now. Sales records, customer information, product catalogs, survey responses.
What if you could just ask questions about that data in plain English and get smart answers back? That’s exactly what we’re going to build today.
I’ll walk you through creating a complete RAG system that works with CSV files. By the end of this tutorial, you’ll have a working system that can answer questions about any CSV dataset you throw at it.
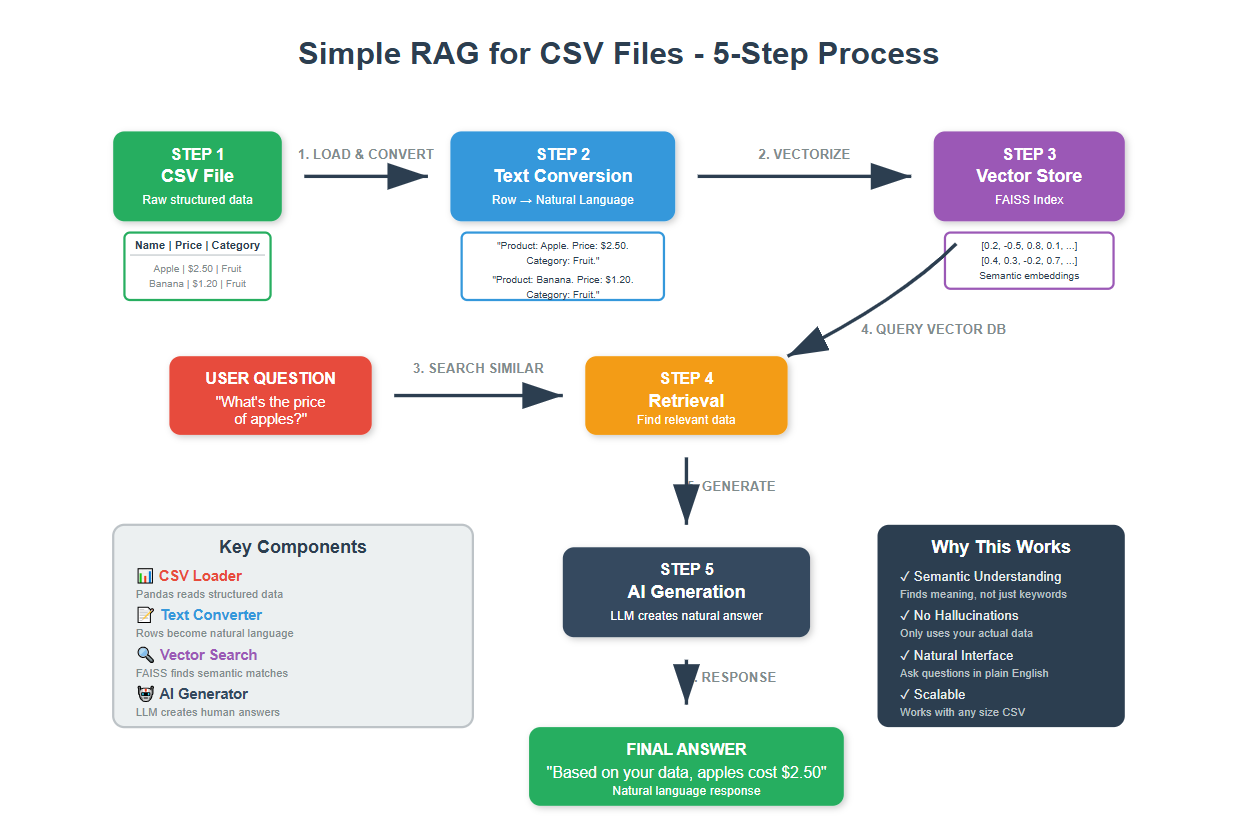
1. Understanding RAG: The Big Picture
Picture this scenario. You ask an AI an analytical about data in your CSV file, but it has no access to your actual data. It might give you generic information or make educated guesses based on its training.
Now imagine the same AI, but this time give it access to you actual CSV data before answering. Much better, right?
But LLMs are designed to work on text data (not tabular). We are going to address that problem in a way by building this csv RAG system.
BTW, the idea we use here can be applied to any tabular format data, not just CSV files. Because, we do this by transforming the numeric data to a textual understandable form.
2. Setting Up Your Environment
Before we start coding, let’s get all our tools ready. You’ll need these libraries installed in your Python environment. This step is optional if you already have a different setup. Just make sure you have the necessary packages.
bash
conda create -n rag python==3.12
conda activate rag
pip install ipykernel
pip install pandas langchain langchain-openai openai faiss-cpu python-dotenv
Let’s now import the packages.
python
import os
import pandas as pd
from dotenv import load_dotenv

# LangChain components for our RAG system
from langchain_community.vectorstores import FAISS
from langchain_openai import OpenAIEmbeddings, ChatOpenAI
from langchain.schema.runnable import RunnablePassthrough
from langchain.schema.output_parser import StrOutputParser
from langchain.prompts import PromptTemplate
from langchain.schema import Document


# Load your environment variables
load_dotenv()
OPENAI_API_KEY = os.getenv("OPENAI_API_KEY")

print("All libraries loaded successfully!")
python
All libraries loaded successfully!
Quick note: Make sure you have a .env file with your OpenAI API key. It should look like this:
python
OPENAI_API_KEY=your_api_key_here
We imported all the tools we need. Pandas will read and handle our CSV files, LangChain will handle the AI magic, and FAISS will store our searchable vectors. Think of these as your toolbox for building the RAG system.
Loading and Exploring your CSV Data
Every great RAG system starts with understanding your data. You can’t make something searchable if you don’t know what you’re working with.
Let’s load the sample CSV file and see what we have
python
# Load your CSV file

csv_file_path = "https://raw.githubusercontent.com/selva86/datasets/refs/heads/master/color_srgb.csv"

# Replace with your actual file path
data_frame = pd.read_csv(csv_file_path)

print(f"Successfully loaded {len(data_frame)} rows from CSV")
print(f"Columns available: {list(data_frame.columns)}")
print(f"Data shape: {data_frame.shape}")

# Look at the first few rows to understand our data structure
print("First 5 rows of data:")
print(data_frame.head())
python
Successfully loaded 16 rows from CSV
Columns available: ['Name', 'HEX', 'RGB']
Data shape: (16, 3)
First 5 rows of data:

Name      HEX               RGB

0   White  #FFFFFF  rgb(100,100,100)
1  Silver  #C0C0C0     rgb(75,75,75)
2    Gray  #808080     rgb(50,50,50)
3   Black  #000000        rgb(0,0,0)
4     Red  #FF0000      rgb(100,0,0)
4. Converting CSV Rows into Natural Language
Here’s where we make our first transformation. Raw CSV data isn’t very searchable by AI. We will convert each row into a sentence that describes what that row contains.
Think about it this way: Instead of having separate columns like “Name: Blue”, “HEX: #0000FF”, we create a sentence like “This is a color named Blue with hex code #0000FF.”
Let me show how to do this conversion:
python
def create_readable_text_from_row(row):
    """
    Convert a single CSV row into a natural language description
    """
    # Customize this based on your CSV structure
    # This example assumes columns: Name, HEX, RGB
    description_parts = []
    for column_name, value in row.items():
        if pd.notna(value):  # Only include non-empty values
            description_parts.append(f"{column_name}: {value}")
    # Join everything into one readable sentence
    return ". ".join(description_parts) + "."
This function takes each row and turns it into a natural sentence. The AI can understand and search through these sentences much better than raw CSV data.
Now let’s convert our entire dataset
python
# Convert all rows to readable text documents
text_documents = []

for index, row in data_frame.iterrows():
    # Convert each row to readable text
    readable_description = create_readable_text_from_row(row)
    # Create a Document object (LangChain's format)
    doc = Document(page_content=readable_description)
    text_documents.append(doc)

print(f"Created {len(text_documents)} document objects")

# A few examples of what we created

print("\nExamples of converted documents:")
for i in range(min(3, len(text_documents))):
    print(f"Document {i+1}: {text_documents[i].page_content}")
python
Created 16 document objects
Examples of converted documents:
Document 1: Name: White. HEX: #FFFFFF. RGB: rgb(100,100,100).
Document 2: Name: Silver. HEX: #C0C0C0. RGB: rgb(75,75,75).
Document 3: Name: Gray. HEX: #808080. RGB: rgb(50,50,50).
We’ve transformed the structured CSV data into unstructured text that AI can understand and search through effectively. Each row is now a complete sentence that describes all the information in that row.
5. Create Embeddings and Vector Store
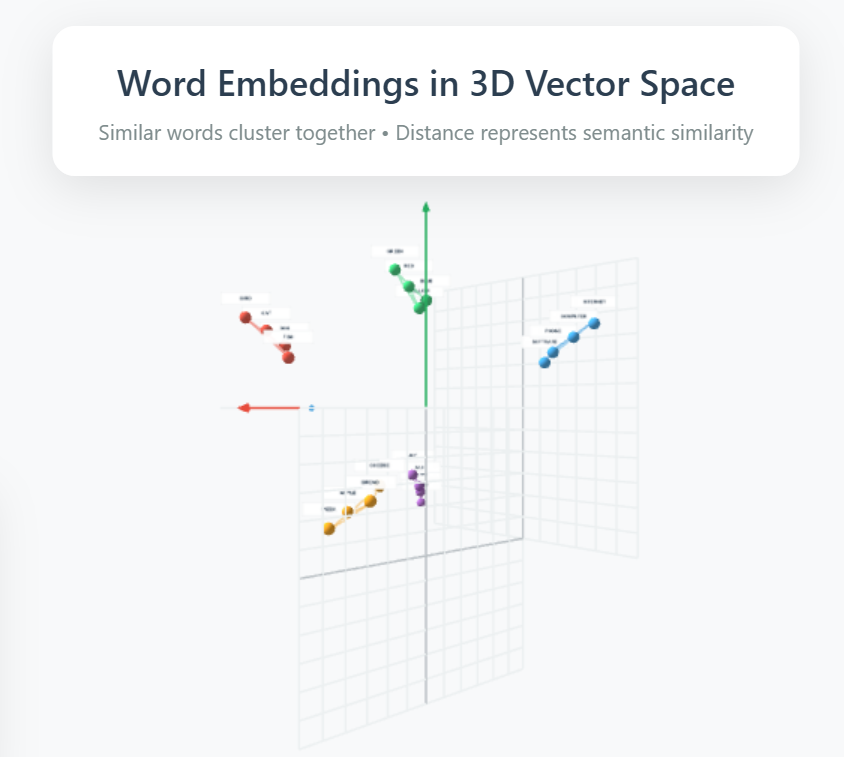
Before we create our search system, We must embed (convert) the textual data to numeric form, because the similarity search works better on such numeric representations, which capture the semantic meaning of the text in the context where they appear.
If we could represent the “meaning” of text as coordinates in space, words with similar meanings would be close together, while different meanings would be far apart.
That’s exactly what embeddings do.
For example in here embeddings convert “Blue color” and “Azure Shade” into numbers (a vector) as they have similarity.
python
# Set up our embedding system
embedding_model = OpenAIEmbeddings()
print("Embedding system initialized")
print("This will convert our text into numerical vectors that capture meaning")
python
Embedding system initialized
This will convert our text into numerical vectors that capture meaning
The embedding model will convert each of our text documents into a list of numbers (a vector) that represents its meaning. These vectors allow us to do mathematical comparisons to find similar content.
6. Building Your Vector Search System
Now we’re going to create a vector database, helps find similar content fast.
Why FAISS?
FAISS (Facebook AI Similarity Search) is open-source, super-efficient at vector based search, has integration with LangChain. However, we are not limited to FAISS, feel free to use any Vector DB of choice.
python
# Create our vector store from the documents
print("Creating vector store from documents...")
vector_search_store = FAISS.from_documents(text_documents, embedding_model)
print(f"Vector store created with {len(text_documents)} documents")
print("Each document is now represented as a vector for fast similarity search")
python
Creating vector store from documents...
Vector store created with 16 documents
Each document is now represented as a vector for fast similarity search
Let’s test our search system to make sure it works
python
# Test our search system
test_query = "blue color"
similar_documents = vector_search_store.similarity_search(test_query, k=3)
print(f"Testing search for: '{test_query}'")
print(f"Found {len(similar_documents)} similar documents:")

for i, doc in enumerate(similar_documents):
    print(f"\nResult {i+1}: {doc.page_content}")
python
Testing search for: 'blue color'
Found 3 similar documents:
Result 1: Name: Blue. HEX: #0000FF. RGB: rgb(0,0,100).
Result 2: Name: Purple. HEX: #800080. RGB: rgb(50,0,50).
Result 3: Name: Green. HEX: #008000. RGB: rgb(0,50,0).
This search system finds documents based on semantic similarity, not just keyword matching. This may not be the perfect example, but given various options related to the question / query, the vector DB retrieves them.
7. Setting Up Your AI Language Model
Let’s build the LLM system that actually answers your questions. We’ll combine our search system with OpenAI’s language model.
Instead of answering from it’s pretrained knowledge, the RAG system (retriever) will first search your documents for relevant information, then pass that information to the LLM to generate accurate answers.
Let’s initialize the LLM model.
python
# Initialize our AI language model
ai_assistant = ChatOpenAI(
    temperature=0,  # Low temperature = more focused, consistent answers
    model="gpt-4o-mini"  # Good balance of quality and cost
)

print("AI assistant initialized")
print("Temperature set to 0 for consistent, factual responses")
python
AI assistant initialized
Temperature set to 0 for consistent, factual responses
8. Creating the RAG Chain with LCEL
This is where everything comes together. We’ll use LangChain Expression Language (LCEL) to create our complete RAG pipeline. Think of this as building an assembly line where each step processes the input and passes it to the next step.
First, let’s create our retriever that will fetch the relevant docs from FAISS db.
python
# Create a retriever from our vector store
document_retriever = vector_search_store.as_retriever(
    search_kwargs={"k": 3}  # Retrieve top 3 most similar documents
)

print("Document retriever created")
print("It will find the 3 most relevant pieces of information for each question")
python
Document retriever created
It will find the 3 most relevant pieces of information for each question
Now let’s create our prompt template. This tells the AI how to respond and how to use the retrieved information.
python
# Create a prompt template for our AI assistant
answer_prompt = PromptTemplate.from_template("""
You are a helpful data analyst. Use the following information from the CSV data to answer the user's question accurately.

Important instructions:
- Only use information from the provided context
- If you can't find the answer in the context, say "I don't have that information in the data"
- Be specific and include relevant details from the data
- Keep your answer clear and concise

Context from CSV data:
{context}

User question: {question}
Answer:
""")

print("Prompt template created")
python
Prompt template created
Now we build our complete RAG chain using LCEL
python
# Build the complete RAG chain using LCEL
rag_pipeline = (
    {
        "context": document_retriever,  # Find relevant documents
        "question": RunnablePassthrough()  # Pass the question through
    }
    | answer_prompt  # Format everything into our prompt
    | ai_assistant  # Generate the answer
    | StrOutputParser()  # Clean up the output
)
print("Complete RAG pipeline created!")
python
Complete RAG pipeline created!
Now we’re building a RAG pipeline that chains components together seamlessly. The pipe operator (|) connects each step in the process. Here’s the flow:
- Your question enters the system and gets processed by the
document_retriever - The retriever finds relevant information context info from the FAISS vector store and formats it into a context string.
- Your original question and the retrieved context is fed into the prompt template
- The complete prompt goes to the AI assistant, which generates a response based on the provided context.
- Finally, the
StrOutputParser()cleans up the response and returns a readable string to you.
9. Testing Your RAG System
Now for the exciting part – let’s test our system with real questions and see how it performs.
python
# Test multiple questions to see how our system handles different queries
test_questions = [
    "What colors are similar to blue?",
    "What is the RGB value for red?",
    "Are there any dark colors in the data?"
]

for question in test_questions:
    print(f"\nQuestion: {question}")
    print("-" * 50)
    try:
        answer = rag_pipeline.invoke(question)
        print(f"Answer: {answer}")
    except Exception as e:
        print(f"Error: {str(e)}")
    print("="*60)
python
Question: What colors are similar to blue?
--------------------------------------------------
Answer: I don't have that information in the data.
============================================================
Question: What is the RGB value for red?
--------------------------------------------------
Answer: The RGB value for red is rgb(100,0,0).
============================================================
Question: Are there any dark colors in the data?
--------------------------------------------------
Answer: Yes, there are dark colors in the data. The colors listed include:
1. Black - HEX: #000000, RGB: rgb(0,0,0)
2. Gray - HEX: #808080, RGB: rgb(50,50,50)
3. Maroon - HEX: #800000, RGB: rgb(50,0,0)
Black is the darkest color, while Gray and Maroon are also considered dark colors.
============================================================
Notice, it did not make up an answer for the 1st question. It could have very well answer from previously learnt knowledge, but instead chose to answer ‘I don’t know’ as instructed.
This is the core of how RAG works – find relevant information, then use it to generate accurate answers!
Free Course
Master Core Python — Your First Step into AI/ML
Build a strong Python foundation with hands-on exercises designed for aspiring Data Scientists and AI/ML Engineers.
Start Free Course →Trusted by 50,000+ learners
Related Course
Master Gen AI — Hands-On
Join 5,000+ students at edu.machinelearningplus.com
Explore Course

